Video Tips for Handbrake on Mac OS X 10.11 El Capitan


At Times you need HandBrake Alternative software to achieve better SD/HD video and DVD/Blu-ray conversion on Mac OS X 10.11 El Capitan, and iMedia Converter for Mac is best recommended HandBrake Alternative for on Mac OS X 10.11 El Capitan. 

Read the Software review>> Pavtube Softwares Comparison | Pavtube DVDAid vs AnyDVD | ByteCopy & MakeMKV | Best Video Converter Ultimate Reviews... 

Handbrake is a open source video transcoder, which is wildly used by Mac OS users. It supports to transcode video and audio from nearly any format to MP4, MKV, AVI on iMac abd MacBook. With Handbrake, you can convert Videos, DVD, Blu-ray on Mac OS X for viewing on your iPad, iPhone, iPod touch easily. 

Following with this detailed HandBrake Mac Tutorial, you will learn how to rip DVD, Blu-ray and transcode videos on Mac OS X with Handbrake. 

Step 1: Download and Install Handbrake 

Firstly, you should download and install Handbrake for Mac on your Mac OS X. 


Note: Here, we can see that HandBrake for Mac OS X 10.6-10.10 is for 64 bit Intel. 

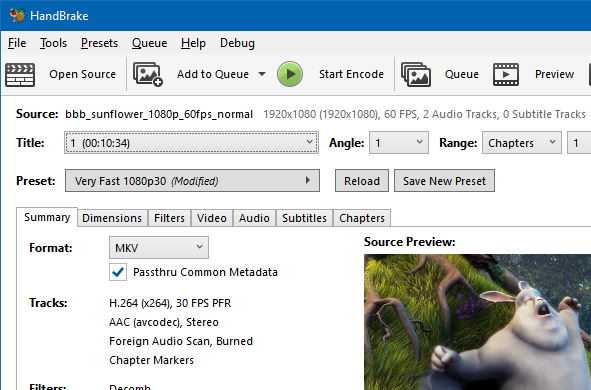
Step 2: Load source video to HandBrake and set Destination and Output 

Click the “Source” button on the main interface to add video, DVD or decrypted Blu-ray to the program. In the Destination section you can set the output folder by clicking Browse button. One thing you need to decide is what format (MP4, MKV, AVI, OGM) Output setting section also has 3 options you can choose: Large File Size, Web optimized and iPod 5G support. 


Note: Handbrake supports to input multiple file formats, but it can only convert them one by one, if you want to transcode many videos, please make sure you have enough time to do it. 

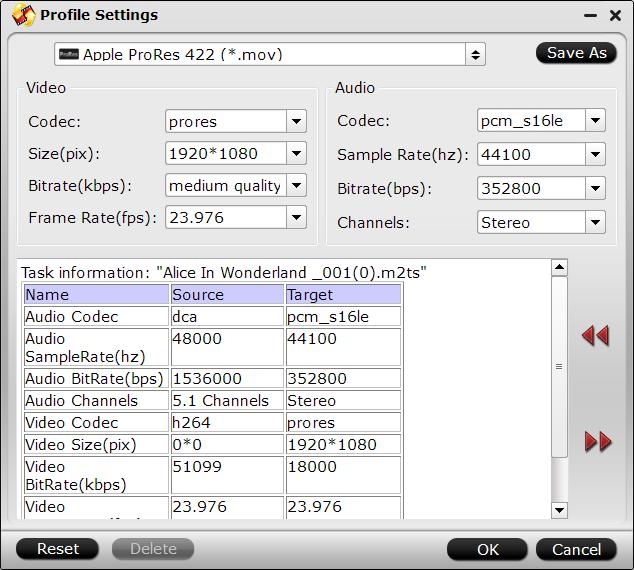
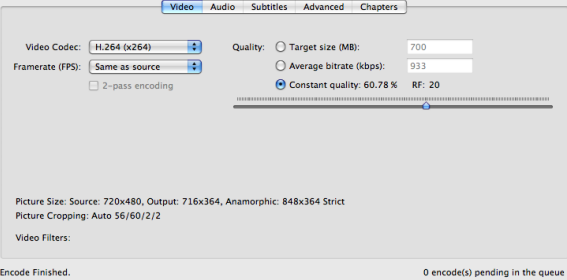
Step 3: Adjust video and audio settings 

You can adjust video filter, video, audio subtitles, chapters, etc to make the output videos more suitable. You should pay attention that when you select the birate, the higher bitrate you choose, the bigger size the output file will be, and the better quality you will get. 


Step 4: Start to convert video with Handbrake on Mac OS X 

Click on the Start button on the left top of Mac version HandBrake. The encoding time will depend on several variables including: the duration of the video file, the speed of your Mac computer and which Mac OS, Mac OS X Tiger, Leopard, or Mac OS X Snow Leopard. What other activity your computer is currently doing, the codec you selected (H264 or MP4). 

Conclusion of this Handbrake Tutorial for Mac: 

This is basic HandBrake Tutorial for Mac OS X users, for details explanation, you need to cast an eye on HandBrake official site. And as a free transcoding software, you may come across with unexpected issues when using HandBrake on your Mac from time to time. Handbrake has some limitations. For instance, it can load multiple video and copy protected DVD, but it does not support the encrypted Blu-ray disc. It only can be used to transcode a Blu-ray disc that the protection is first removed using a third party application. It does not support batch conversion and shut-down automatically after conversion. And the most severe problem is HandBrake just supports Mac OS X 10.6 - 10.10. The newest Mac OS X 10.11 El Capitan system is not supported by HandBrake. 

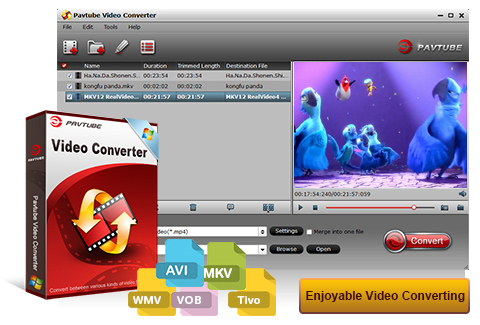
Therefore, it is better to find some HandBrake Mac version Alternative software to fill all the limitations that Handbrake lacks, such as backing up encryption Blu-rayripping DVD to iTunes, copying Blu-ray andDVD on Mac OS X El Capitan. Pavtube iMedia Converter for Mac is the recommended HandBrake Alternative. It is all in one solution for you to convert SD/HD videoS, rip DVD/Blu-ray to various formats on Mac OS X from 10.6 to 10.11 El Capitan. You can use the batch conversion functions to transcoding multiple files at a time. The versatile and distinctive editing functions can help you create elegant videos. 

Free download and install 


Other Download: 
- Pavtube old official address: http://www.pavtube.cn/imedia-converter-mac/ 
- Cnet Download: http://download.cnet.com/Pavtube-iMedia-Converter/3000-2194_4-76177788.html 

How to use HandBrake Mac Alternative on Mac OS X El Capitan? 

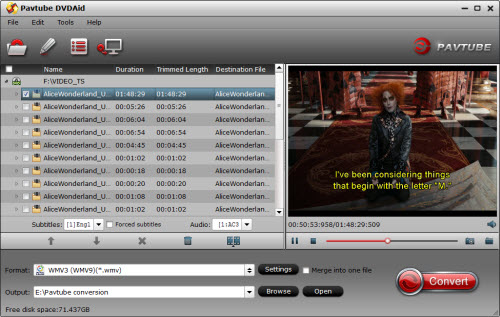
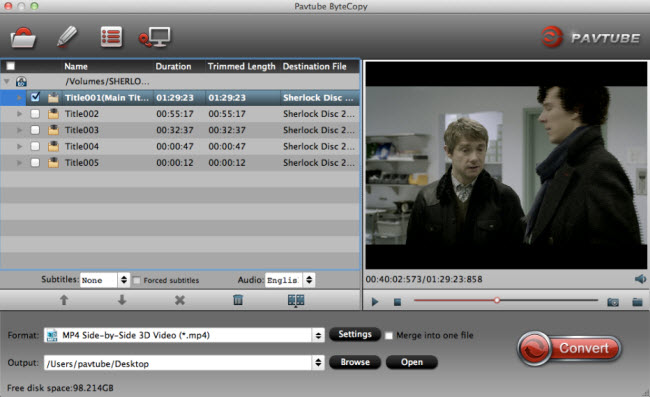
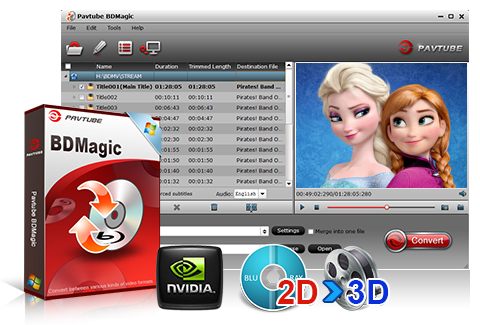
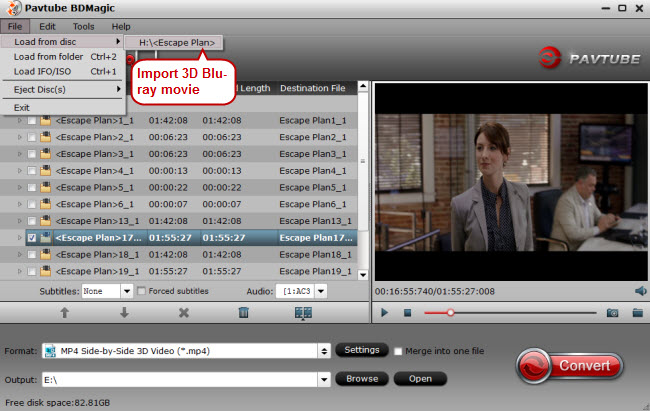
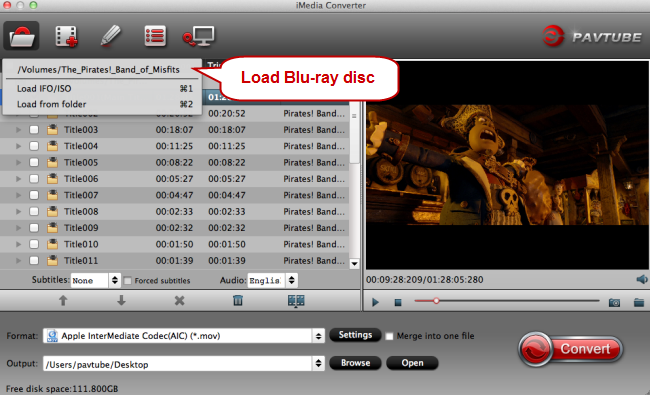
Step 1. Load your Blu-ray 

Run Pavtube iMedia Converter for Mac on Mac OS X El Capitan, load your Blu-ray disc, folder, ISO image files by clicking the "File" icon. 


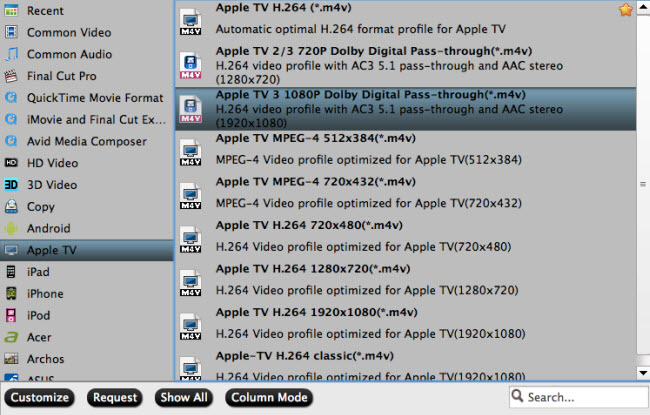
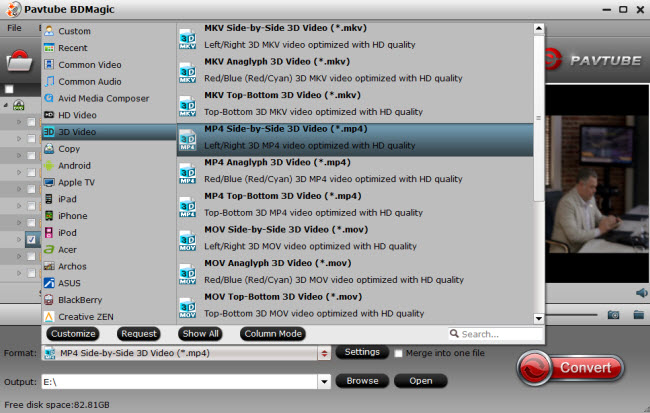
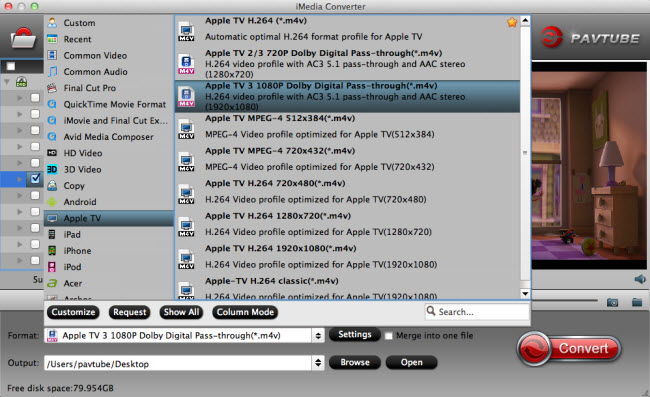
Step 2. Choose target format 

Click the format bar to choose "HD Video" and "H.264 HD Video (*.mp4)". 


Step 3. Start conversion 

After everything is OK, click the big button "Convert" to start conversion on Mac OS X El Capitan. After conversion, you'll get your desired MP4 movie in output folder. 

That is easy to use HandBrake Mac Alternative to convert videos on Mac OS X El Capitan. Just try. 

If want more detailed video conversion steps, read this article: How to Convert Videos on Mac OS X El Capitan with Pavtube iMedia Converter for Mac? 

Read More: 

Good News! To thanks for your continuous support, Pavtube Official Website and Pavtube Facebook are now holding the biggest sale for this summer with fantastic 50% off discounts and giveaway. Pay less to get powerful Blu-ray/DVD/Video Converter to build your own home media center on this summer! 

Giveaway: First Five customers can share this post, email us your order numer and the snapshot to win one more FREE license, no product limit! 

Related Article: 


Src 
HandBrake Mac Tutorial on Mac OS X 10.11 El Capitan 

How to NEL Editing DVD Files with Apple ProRes 422 on Win


Summary: There is another choice for DVD fans to have a high quality to save or edit. This article gives you the guide to convert DVD files to Apple Prores 422 

Hot SearchTypes of Apple ProRes Codecs | Apple ProRes Info & Tips | Apple Prores Codec on PC 

Prores is the lossy video compression format developed by Apple Incorporation for use in post production. It can provide an unparalleled combination of multistream, real-time editing performance, impressive image quality and reduced storage rates. It supports any frame size including SD, HD, 2K, 4K and 5K at full resolution. 

If you are a DVD fans, and would like to edit DVD clips or customize the profile for sharing or collecting, I would say that there is no better formats than Prores for you. In some different case, you really need a certain project with Prores format file, what should you do? 

Although Apple has licensed and certifies Prores for specific software, cameras and hardware devices only on Mac OS X. For Windows users, you will need to consider the purchase of a product that helps you encode or decode Apple Prores. You could convert DVD disc PC and transfer it to your Removable HDD and NEL editing while available. 

As one of the most popular video formats in professional video production and post-production, Apple Prores codec is designed by Apple for high-quality and high-performance editing in Final Cut Pro X. Does it impress you? I think you do. Okay, here is a very powerful DVD ripper-- Pavtube DVDAid Converter for you to make your thought come true. With it, you can transcode all the DVD files to Apple Prores for usage on Windows 10 and its previous version. Follow the guide steps below and convert DVD files with Apple Prores. 


Other Download: 
- Pavtube old official address: http://www.pavtube.cn/dvd_ripper/ 
- Cnet Download: http://download.cnet.com/Pavtube-DVDAid/3000-7970_4-76158510.html 

How to NEL Editing DVD Files with Apple ProRes 422 on Windows 10/8.1/8/7 

Step 1: Load DVD files. 

Put DVD disc into DVD drive on your PC and then click "File", from its drop-down list, select "Load from disc" to import vob files to the program. 


Step 2: Choose Apple Prores output file format. 

The program allows you to output 4 types of Apple Prores format from "Final Cut Pro" extended options, you can select "Apple Prores 422 (*.mp4)" . 


Step 3: Set output profile parameters. 

Technical specifics of output video codec, size, bitrate, frame rate and audio codec, sample rate, bitrate and channels can be flexibly adjusted according to your own needs. 


Step 4: Encode Apple Prores codec on Windows. 

When all the setting is completed, press the right-bottom "Convert" button to start the Apple Prores encoding process in PC. 

After the conversion, you can find generated Apple Prores codec by clicking "Open output folder" on the program interface. 

More 

How to Rip DVD to PS4 for smooth viewing on Mac? 
Tips and Tricks for Selecting a Blu-ray to MKV Ripper 
Import DVD to Avid Media Composer on Mac 
Backup DVD to MKV/HD MKV on Windows 10 
Export Blu-ray/DVD content to Avid Media Composer with high-quality video 
How to stream H.265/HEVC 4K Videos to Apple TV 4/3/2/1 on Mac 
Remove Disney DRM Copy Protection and Backup Disney DVD Movie 
Tips and Tricks for Selecting a Blu-ray to MKV Ripper 


Src 
How to NEL Editing DVD Files with Apple ProRes 422 

How to stream H.265/HEVC 4K Videos to Apple TV 4/3/2/1 on Mac


Summary: With the newest released Apple TV 4, more and more people are concentrate their eyes on the new device and care about h.265/4k videos supported or not. 

How to stream H.265/HEVC 4K Videos to Apple TV 4/3/2/1 on Mac


As for H.265/HEVC format, I'd like to call it H.265, because it sounds cool, but it's full name is High Efficiency Video Coding (HEVC). It's the new successor to Advanced Video Coding (AVC), also known as H.264, which is one of the compression schemes used by Blu-ray. The idea of HEVC is to offer the same level of picture quality as AVC, but with better compression, so there's less data to deal with. 

With the growing popularity of H.265/HEVC video, more and more people want to experience a sense of breathtaking from ultra high definition picture. Apple Supports H.265, but So Far Only in Face-time on an iPhone 6. Can the Apple TV hold or play H.265/HEVC video? The answer is, disappointing, that it should, but not truly can. 

You can convert/decode H.265/HEVC 4K videos for playing on Apple TV 4/3/2/1 without obvious quality downgrade. Here I recommend you a powerful H.265 encoder, decoder and converter--Pavtube iMedia Converter for Mac. It can help you convert H.265 videos to Apple TV 4/3/2/1 supported MP4/MOV/M4V files on Mac OS X(including Yosemite/Mavericks) with the best quality. It's easy to use, and performs professionally. What's more, this video converter severs as a wonderful H.265 video player for you. And with the built-in video editor, you can personalize and retouch your videos in clicks. 


Other Download: 
- Pavtube old official address: http://www.pavtube.cn/imedia-converter-mac/ 
- Cnet Download: http://download.cnet.com/Pavtube-iMedia-Converter/3000-2194_4-76177788.html 

How to stream H.265/HEVC 4K Videos to Apple TV 4/3/2/1 on Mac 

Step1. Add H.265 files to the converter 

Install and launch the H.265 to Apple TV 3 Converter on your Mac, and then click "Add" button to browse to H.265 footage or directly drag the H.265 video to the program. 


Step 2. Choose Apple TV format 

Click “Format” bar and turn to the Apple TV category. The program has a number of presets for Apple TV, Apple TV 2, and Apple TV 3rd Generation, to export a Apple TV 3 1080p video with ac3 5.1 pass-through for AV receiver decoding, “Apple TV 3 Dolby Digital Pass-through (*.m4v)” preset is recommended. 


Note: By choosing this format, you will get two sound tracks in the result M4V video, one is stereo, and the other is AC3 encoded Dolby Digital 5.1 pass-through. When your Apple TV is connected to audio receiver, the 5.1 surround sound will work. When ATV is connected to your HDTV only, the stereo track will work. 

4. Start conversion 

After everything is OK, simply click the big “Convert” button to start converting H.265 videos for Apple TV 4/3/2/1. Once the conversion finished, you can easily transfer the converted H.265 files to Apple TV for playing anytime you want. 


Top 5 Video Tools for Playing Video/Movie on Android Tablet/Phone

Top 5 Video Tools for Playing Video/Movie on Android Tablet/Phone 

Hot Search: Top 5 Blu-ray Ripper | Top Mac Blu-ray Ripper for Android Top 5 DVD Ripper 

People like to shoot videos to preserve life memories and share life with family and friends. Gone are the days when video shooting can only be done with professional camcorders or cameras. With the emergence and fast development of smartphones, anyone can now easily shoot whenever they want with their Android phones or Tablets. Though videos captured by Android phones and tablets is very convenient and of high quality, often, we will need to do some editing work on videos on Android devices on the go for better quality. 

Top 1. Handbrake for Windows/Mac 

HandBrake is a tool for converting video from nearly any format to a selection of modern, widely supported codecs. 

Reasons you’ll love HandBrake:
  • Convert video from nearly any format
  • Free and Open Source
  • Multi-Platform (Windows, Mac and Linux)


Top 2. Pavtube Video Converter for Windows/Mac 

Pavtube Video Converter Ultimate is the best Video solution for Android Tablet/Phone users to backup BD/DVD, compress disc and transcode video clip to almost all popular video and audio formats. 


Top 3. Pavtube DVDAid for Windows/Mac 

Pavtube DVDAid provides the best solution to rip DVD and convert DVD to video and audio in popular file formats for Android Tablet/Phone. It could backup DVD and convert DVD to various video and audio formats including MP4, MKV, MOV, AVI, WMV, MP3, AAC, etc to let you enjoy DVD movies on any Android Tablet/Phone like Galaxy S6, Galaxy S6 Edge, Kindle Fire HDX, PS3, PSP, Surface, and more. Surprisingly it adds H.265/HEVC as output video format in order to satisfy users who ask for high video quality. 


Top 4. Pavtube BDMagic for Windows/Mac 

With Pavtube BDMagic, now you can convert 2D Blu-ray, 3D Blu-ray and standard DVD to SD, High-Definition formats or even create 3D videos with excellent video/audio quality in fast conversion speed. If your Android Tablet/Phone’s storage large enough, you would be have a nice experience. 


Top 5. Pavtube ChewTune for Windows 

Pavtube ChewTune, one of the smartest yet easy-to-use DRM media converter, adopts an unique DRM decrypting technique to strip DRM off from all movies downloaded from iTunes, Amazon store, Digital Copies (bundled with DVD/Blu-ray discs), BBC iPlayer, Zune Marketplace, Nokia Music Store. With the all-in-one DRM remover and recorder, you can record, convert both DRM-ed and non-DRM video and music to all popular video/audio formats in order to ensure free playback on Android Tablet/Phone like Samsung, Google, etc. 
 

You perhaps want to get all of the top 5 app, actually, the all functions in the top5 app. It doesn’t matter, here i recommend you a package of all-- Pavtube Video Converter Ultimate ( for windows )/Pavtube iMedia Converter ( for mac)

Pavtube Video Converter Ultimate/Pavtube iMedia Converter is more than just a converter. It comprises a video converter, blu-ray ripper and dvd ripper to process Blu-ray, DVD and videos. This feature-rick Mac video converter toolbox can not only copy 2D BD, 3D BD and standard DVD with original structure, and convert all BD/DVD collection to virtually any video and audio format for Android other devices. 


Summary: Ultimately, the very best way to enjoy your favorite videos and Blu-ray/DVD movies on the go would be to utilize the Pavtube Android Video Converter Ultimate, which gives you all of the options necessary with no restrictions, affordable, convert videos/blu-ray/dvd/iso/ifo with a highest speed, perfect audio and video synchronization, support adding srt/ass/ssa subtitles, etc. What's more, the app supports copy the entire BD/DVD disc content to computer hard drive with original structure and all audio/subtitle tracks and chapter markers preserved. Nevertheless, Handbrake is amongst the best free Android Video Converter. If you have any other suggestions, welcome your comments and feedback. 

More 

Playing Blu-ray on iPad/iPhone in M3U8 format Without loading 
Native Editing MKV to EDIUS Pro 8 for Enjoying? 
Convert MP4 to iPad Air for Playing 
Import Panasonic 4K Footage to EDIUS Pro 7 for Editing 
Sony F55 XAVC codec- Convert F55 XAVC to Prores HQ for FCP 
Makes It Easy to Watch Blu-ray(ISO) on Windows Media PlayerQuestion: 
Share and Upload 4K XAVC on YouTube/Google/Myspace 
Backup Top 10 3D Movies on Blu-ray/DVD for Watching 


Src 
Top 5 Video Tools for Playing Video/Movie on Android

Watch 3D Films on Android Phones via Google Cardboard


“I am new to cardboard and I was wondering if you can watch full films in 3d? And if so, how? 
Thanks in advance.” 

Did you have the same problem mentioned above? Did you have got any idea about how to go through the problem? If the answer is no, the suggestion below would helpful for you. 


Watch 3D Films on Android Phones via Google Cardboard

In order to get 3D files on Google Cardboard via Android phones, what you need to do is to rip 3D movies to Android compatible 3D SBS videos. Here I would rather recommend you Pavtube BDMagic to get the task done.It can professionally rip 3D movies to Android phones supported side-by-side-3D .mp4 video format with fast speed and excellent output quality. In addition, this 3D movie ripping tool can also convert 3D Blu-ray to various popular video formats like AVI, MP4, WMV, MPEG, MOV, FLV, MKV, 3GP, etc. as well as rip 3D videos to optimized video for playback on Air VR, Gear VR, Rift DK2, 3D TV, iPad, iPod, iPhone, Blackberry, Xbox 360, PS3, Galaxy Tab and more. If you are a Mac user, you can turn to 3D Pavtube BDMagic for Mac, which has the same function as the Windows version. Now download the right version and follow the tips below to finish your task. 


Other Download: 
- Pavtube old official address: http://www.pavtube.cn/blu-ray-ripper/ 
- Cnet Download: http://download.cnet.com/Pavtube-BDMagic/3000-7970_4-75922877.html 


Other Download: 
- Pavtube old official address: http://www.pavtube.cn/blu-ray-ripper-mac/ 
- Cnet Download: http://download.cnet.com/Pavtube-BDMagic/3000-7970_4-76177782.html 

Watch 3D Films on Android Phones via Google Cardboard 

Step 1: Import video. 

Click the “Add video” button, browse to computer hard drive and import video into this app. 


Step 2: Output Cardboard compatible 3d format. 

Tap on "Format" bar and find "3D Video", there are a lot of format options for you. You can choose the output 3D format according to your phone, here "MP4 Side-by-Side 3D Video (*.mp4)" is recommended for Android phones. 


Step 3: Convert Video to Google Cardboard SBS 3D MP4. 

Hit right-bottom "Convert" button to start the conversion process. 

When the conversion, transfer the generated files to your phone to watch on Cardboard with the Cardboard theater app. 

Convert TiVo to Apple ProRes MOV for editing on Mac and burn them to DVD

Convert TiVo to Apple ProRes MOV for editing on Mac and burn them to DVD 

TiVo is a popular DVR device that can help people record TV shows easily. Maybe you have record your favorite TV programs using it. And if you want the .tivo videos is playbacked very good on your Mac, you need to edit them in advance. FCP are editing software widely used by Mac users. But as we all know, TiVo videos (plain MPEG2 videos) are not accepted by FCP, so, to edit TiVo videos, you need to convert the TiVo files to your editor accepted formats in advance like MOV. 

To carry out this conversion, a powerful Video Converter is needed. Here Pavtube iMedia Converter for Mac is highly recommended, which is a professional TiVo converting program on Mac. It can run on Mac OS X 10.9 Mavericks, 10.8 Mountain Lion, 10.7 Lion, Snow Leopard10.6 and Leopard 10.5. And with it, you can convert your TiVo video to Apple ProRes 422, Apple ProRes 422 HQ or Apple ProRes 4444 for using in Final Cut Pro X/7/6 with original quality. It also provides simple video editing functions for you. If you want to edit video simply like trimming and cropping, splitting and merging and so on, Pavtube iMedia Converter for Mac can help you. 

Now free download this program and install on your Mac (Pavtube offers trial version for 30 days) 

Step one. Run this Tivo to FCP Converter for Mac, click the top left icon to import your TiVo files. 


Step two. Choose “Final Cut Pro -> Apple ProRes 422(HQ)(*.mov)” as the best intermediate video format for editing TiVo in Final Cut Pro X.


Tip :

1. Pavtube programs also support customizing video size, bitrate(quality), frame rate and other settings; click “Settings” and change the figure as your needs.
2. If you want to share the ultimate video with others or just enjoy by yourself, the ads could be very annoyed. You can use Pavtube iMedia Converter for Mac’s editing functions to trim, crop, add subtitles and edit audio features.

Step three. Now click the big “Convert” to start this easy conversion. Wait for a few moments; you can click “Open” to locate the converted video directly.

OK, let’s import video files into FCPX for editing. After you have edited, you can burn your favorite TV programs to DVD, so that you can enjoy your favorite TV programs anywhere and anytime without catching time all the time. If suggest you to use Pavtube DVD Creator for Mac to burn MOV videos to DVD, which is the easiest and fastest way to burn DVDs, even Blu-ray discs for Mac.

Before you burn videos to DVD with DVD Crestor, you should export Final Cut Pro projects to MOV files in advance. (Click File > Export > QuickTime Movie )

Step 1 – Import QuickTime movie to the DVD Creator for Mac
Run Pavtube DVD Creator for Mac, click “Import” tab to load the FCP exported MOV files into the program. Or you can just drag & drop the MOV files into it for burning.

Tips: To create another Title, click the “Add Title” button and add more source videos. Please notice the size indicator at the bottom, if exceed the red line, you are suggested change to DVD9 or remove some videos.

Step 2 – Author DVD menu

Pavtube DVD Creator for Mac enables you to custom a DVD menu to fully access your Final Cut Pro video on DVD disc. There are three built-in DVD menu templates under “Menu” tab for you to choose from. If you don’t want a menu, you can choose no menu. After selecting a menu template, you can change menu buttons, thumbnails, add text, background music and background images to author a personalized DVD menu.

Step 3 – Preview and burn MOV files to DVD on Mac

Switch to “Preview” tab to have a look at the final playback effect of your DVD. If anything needs to be changed, go back to the former steps to do modification. Once you are satisfied, go to “Burn” tab to set settings like video standard (PAL or NTSC), audio channels (5.1 channels, Mono, Stereo), output settings, disc label, and DVD drive (please insert a blank DVD disc into your selected DVD writer). Press “Burn” button and the Mac DVD authoring program will start creating DVD from FCP MOV source files automatically. 


More 

Stream MKV Files to Chromecast with Plex Server 
What is better “Apple TV or Chromecast? 
Play Any Videos on Apple Devices via Plex Media Server 
Solution – How to Fix ‘Cannot Play Video on OneDrive’ Error 
import FLAC, OGG, WMA, DTS to iPhone 6s/6s Plus iOS 9 
How to transfer iTunes M4V videos to Kindle Fire HDX 7? 
Solutions of Backup DVD to WD My Cloud for Streaming and Playing 
Backup Non-commercial and Protected DVD to Computer 

Src 

Backup Blu-ray to Plex media server for Apple TV playback


Hot Searchplayable file format for Apple TV | Blu-rays on Mac Laptop or Apple TV 3 |Blu-ray Movies on Apple TV 4 

Plex Media Servers are all the rage lately. The Plex can provide playback for your Blu-rays in their original quality. Now, Apple TV 4 owners will finally get their own Plex client and be able to stream all media files directly to Apple TV 4. If you have collected lots of Blu-ray discs, you may want to rip and stream Blu-ray movies to Apple TV 4 via Plex media server. 

It is well known that Apple TV supports very few formats, which include H.264 and MPEG-4 videos. The detail supported formats: 

  • H.264 video up to 1080p, 30 frames per second, High or Main Profile level 4.0 or lower, Baseline profile level 3.0 or lower with AAC-LC audio up to 160 Kbps per channel, 48kHz, stereo audio in .m4v, .mp4, and .mov file formats
  • MPEG-4 video up to 2.5 Mbps, 640 by 480 pixels, 30 frames per second, Simple Profile with AAC-LC audio up to 160 Kbps, 48kHz, stereo audio in .m4v, .mp4, and .mov file formats
  • Motion JPEG (M-JPEG) up to 35 Mbps, 1280 by 720 pixels, 30 frames per second, audio in ulaw, PCM stereo audio in .avi file format


It is meaning that Blu-ray cannot work with your Plex channel on Apple TV. This means you will have to convert your Blu-ray/DVD videos to an Apple TV supported file format . To do the Blu-ray via Plex task, we need to get some help from third-party software. For this purpose, you will have to find a good BD/DVD ripper for Apple TV. 

I would recommend you a best program for ripping Blu-ray movies for Apple TV 4--Pavtube BDMagic for Mac. It aims to solve this problem by giving us the ability to store our purchased physical Blu-ray discs to local computer, hard drive then stream over a home network for Plex Media Server and for Apple TV 4 playback. It’s professional in ripping and converting Blu-ray discs, Blu-ray ISO image, Blu-ray copies and more. For Windows users, turn to Pavtube BDMagic for Windows


Other Download: 
- Pavtube old official address: http://www.pavtube.cn/blu-ray-ripper/ 
- Cnet Download: http://download.cnet.com/Pavtube-BDMagic/3000-7970_4-75922877.html 


Other Download: 
- Pavtube old official address: http://www.pavtube.cn/blu-ray-ripper-mac/ 
- Cnet Download: http://download.cnet.com/Pavtube-BDMagic/3000-7970_4-76177782.html 

Backup Blu-ray to Plex media server for Apple TV playback 

Step 1: Load Blu-ray disc. 

Insert the Blu-ray disc into your Blu-ray drive. Start up the program on your computer, click "File" > "Load Disc" option to add Blu-ray disc movies to the program. 


Step 2: Choose Apple TV supported format. 

Pavtube includes a particular category for Apple TV 3, and just select one from this Apple TV list from "Format" menu for output. 


Step 3: Rip Blu-ray to Apple TV. 

Start converting the Internet movies by hitting on the "Convert" icon. When the conversion is done, you could find the generated M4V movie. 

Step 4: Stream Blu-ray movies to Apple TV 4 via Plex media server. 

When the conversion is over, upload the converted files to the Plex client you owned and stream them to your Apple TV. Have a good time! 


More 
Are you facing troubles in YIFY Torrents stream via Plex? Solved! 
Upload GoPro Hero 4K Video to DropBox 
4K to Note 5 – Enjoy 4K Videos to Samsung New Galaxy Note 5 
Stream and Convert MKV to Apple TV 4 and Playback in M4V 
Watch iTunes Movies on Samsung 4K UHD TV via USB Flash Drive 
Losslessly convert iTunes M4V videos for PS3 Playback 
Blu-ray to MKV Ripping- How to keep Dolby Digital TrueHD 7.1 Audio 
How to Rip DVD Movie to H.264 MP4 for playback on Microsoft Surface Pro 

Src 
Backup Blu-ray to Plex media server for Apple TV playback