Backup DVD to MKV/HD MKV on Windows 10 MKV format can hold unlimited and any type of audio, video and subtitle streams. It can make you put a complete movie into a single file including various audio, video and subtitle streams as well as menus and chapter structure. You can find everything in a MKV file when ripping and backing up DVD movie to MKV file. MKV movie can be played on PC and HDD media players. After finishing DVD backup, you can play the MKV file via VLC media player on computer which can fully support MKV playback. Players like Media Player Classic and MplayerX are also great MKV-compatible media players. External HDD media players like WD TV series, Porpcorn Hour, and Seagate Free Agent can also realize MKV playback, too. So ripping DVD to MKV/HD MKV can make you enjoy DVD movie on above multiple players. Pavtube DVDAid is a grand helping hand to achieve this. It can rip and backup the newest and region-locked DVD disc to MKV/HD MKV with high definition and ultra fast speed. It supports many Windows systems like Windows 10/8.1/8/7 and Vista. So you can rip DVD to MKV/HD MKV on the newest Windows 10. With powerful video editing features included, you could trim, crop, insert subtitles, add watermarks, adjust video effects, etc. to create your own movie for playback. You could adjust video codec, video display ratio, bitrate, frame rate and more presets to get great DVD experience. Of course, as a DVD ripping tool, it has wide range of output formats supported. Both standard and HD formats like H.265, M3U8, MP4, AVI, MKV, WMV, M4V, MP3, M4A, WAV, etc. can be created out of source DVD movies with fast conversion speed. With these rich output formats, you could freely convert source DVD to watchable movies for your device, mobile phones, tablets based on iOS/Android/Windows, Game Consoles, and other media players.(ReadReview) Free download and install: 
 Other Download: - Pavtube old official address: http://www.pavtube.cn/dvd_ripper/ - Cnet Download: http://download.cnet.com/Pavtube-DVDAid/3000-7970_4-76158510.html How to rip DVD to MKV/HD MKV on Windows 10? Step 1: Load DVD disc to the software. Insert your DVD disc into your computer DVD drive, then launch the program, from "File" menu drop-down list, select "Load from disc" to import source DVD disc movies to the program.
 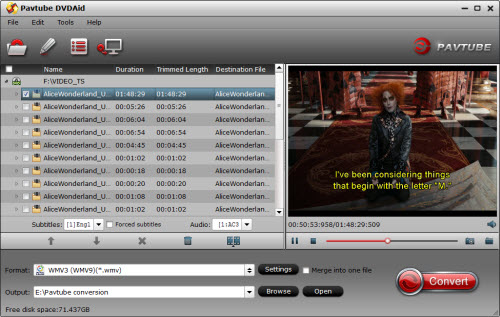 Step 2: Choose MKV/HD MKV format You can click “Format” bar and you will find Common Video and HD Video. In their drop-down list, you can find “MKV(Matroska) Video(*.mkv)” and “ MKV HD Video(*.mkv)”
  Tip: Open "Profile Settings" window, here you can adjust the output video codec, size, bit rate, frame rate, audio codec, sample rate, bit rate, channels to make the ripped DVD movie to play perfect.
  Step 3: Backup DVD to MKV Carry out the conversion process by hitting the right-bottom convert button to start to rip DVD to MKV/HD MKV video for streaming. After ripped DVD to MKV/ HD MKV, you can enjoy this movie on your Popcorn Hour A-400, VLC, etc. In addition, if you want to rip DVD to lossless MKV with original video quality, you can use Pavtube ByteCopy. It can rip and copy commercial DVD/Blu-ray to lossless MKV with multiple video, subtitle streams and chapter markers at fast speed.
Overview:Many users decided to backup all their bluray iso for playing on WD TV Live. The Wd can see it and play it without a problem, the only thing is that when you want to change audio track you can't see which language you’re choosing! You have to switch all of them to find the right one (same thing for the subtitles). Here we give you the solutions to solve it and the sample steps to allow you handle it smoothly.Hot search:Convert DVD to WD|Connect WD TV to Your Home Theater|Convert DVD to HD AVI on WD|Multi-track MKV watching on WDTVThe WD TV is a consumer device produced by Western Digital that plays videos, images, and music from USB drives. It can play high-definition video through an HDMI port, and standard video through composite video cables. With WD TV Live media player, can you play Blu-ray files on your TV? The answer is some kind of disappointed. WD TV can not play a Blu-ray ISO at all because of the format of Blu-ray doesn’t supported by WD TV Live media player. There is anther solution for playing Blu-ray on WD TV Live. Except Blu-ray ISO, WD TV can play most common video and audio formats .Below is the complete WD TV supported video format list.
- AVI (Xvid, AVC, MPEG1/2/4)
- MPG/MPEG
- VOB
- MKV (h.264, x.264, AVC, MPEG1/2/4, VC-1)
- TS/TP/M2T (MPEG1/2/4
- AVCVC-1)
- MP4/MOV (MPEG4, h.264)
- M2TS
- WMV9
- FLV (h.264)
You can convert your Blu-ray ISO to other format list above for watching on WD TV Live. In this case, a professional Blu-ray to WD TV Ripper is the key to assist you to rip your Blu-ray ISO to WD TV supported video formats. Pavtube Bytecopyis the best tool I’d like to recommend to you. It is a powerful program with the ability of backing up Blu-ray ISO collection to multi-track MKV without quality loss.It is a pity that you can't edit videos if choosing multi-track output formats currently. Do not hurry, this Blu-ray to WD TV converter allows you to lossless backup Blu-ray with whole structure or just make a main movie copy of Blu-ray ISO. This two choice could satisfy you with full edit function. For example, you can add *.srt or *.ass/*.ssa subtitle-files to the video as hard subtitles. Is it funny? Follow the step and get Blu-ray ISO convert to WD TV starts. Other Download:- Pavtube old official address: http://www.pavtube.cn/bytecopy/- Cnet Download: http://download.cnet.com/Pavtube-ByteCopy/3000-7970_4-76158512.htmlHow to play Blu-ray ISO movies on WD TV Live?Step 1. Load Blu-ray files.Launch Bytecopy, then click “File” >> “Load from IFO/ISO” with double click the chapter then you can preview it in the preview window. Step 2. Choose output format.Click format bar choose “Multi-track Video” >> “Loss/encoded Multi-track MKV (*mkv)” as the output format.
 Tips: the program uses lossless output, but if you prefer to encode the file, you can click Settings button and go to Video Tab under Multi-task Settings window to check Encode and specify video codec. You can choose what audio codec you’d like to encode with as well.
 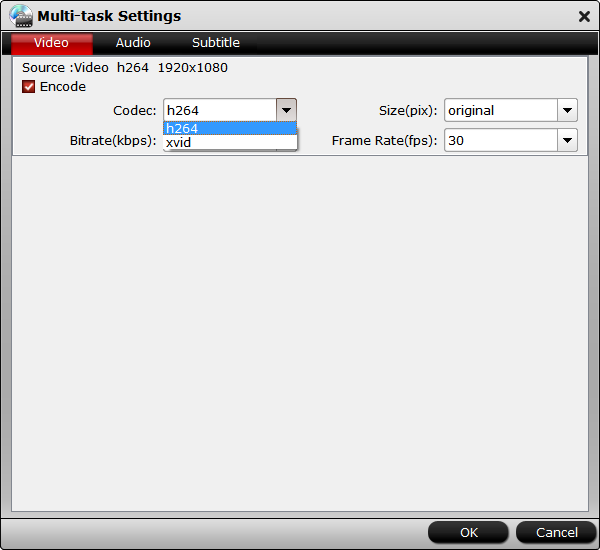 Step 3. Starts conversion.To hit the “Convert” button on main interface to get Blu-ray ISO to MKV conversion begins.Now the Blu-ray ISO files are supported by WD TV, and steam them to your TV for free enjoyment.Note: If you are using a trial version, there will be Pavtube logo watermark in the middle of output files. To get rid of the logo watermark and get better performance, please click here buy full version for Windows or full version for Mac.
More
Top 5 Great and Free QuickTime Alternative to Play Any Video Flawlessly
How to Play Blu-ray via Apple TV on Large Screen
How to Copy DVD to iPhone 6S Easily and Fast?
How to Move Your iTunes Movies to External Hard Drive?
Handbrake No Title Found Issue When Ripping DVD, Solved!
Backup Blu-ray to Samsung Galaxy Tab S2
How to upload over 500 DVDs to Seagate Wireless Plus
Mediacoder Alternative Review: Convert Video/Audio in Windows 8.1/8
Src
How to play Blu-ray ISO on WD TV Live without quality loss
Summary:It maybe the best thing that you have ever imagined for reviewing a favorite dialogue from a Blu-ray without audios and videos when you want to stay alone, especially for a Blu-fans. Sometimes they even have troubles with backup Blu-ray to their portable devices, let alone subtitles. Well, I’ll be glad to get you out of this difficult issues.Hot search: Extract .srt subtitles from DVD | Top 5 Subtitle Download Sites | Add subtitles to DVD MoviesIn order to extract subtitles from the Blu-ray Disc, the very two background knowledge you should take a quick look first. The Subrip format, are more commonly known as subtitles, which has a file extension of ".srt," is used for caption files that are read by video player programs such as Windows Media Player and Quicktime. These subtitles can be opened with special programs that are made to run them in conjunction with the movie you are watching. However, it is also possible to just open and edit the file with any text editor program such as Notepad or WordPad.Blu-ray Disc usually encrypted that you can only play it without change any structure like video, audio track, subtitles. There is any way to extract subtitles from the Blu-ray Disc? Of course, as the saying goes, there are more solutions than problem. You just need a extract converter which has it’s professional name Pavtube ByteCopy for Mac (if you are a windows user, you can get windows version Pavtube ByteCopy for Windows, the following steps are all the same except program version) at first. The next things the program will give you the best solutions. Don’t be afraid of having no experience how to extract *.srt subtitles from Blu-ray, the below sample steps will give you a lot of favors.
 Other Download:- Pavtube old official address: http://www.pavtube.cn/bytecopy-mac/- Cnet Download: http://download.cnet.com/Pavtube-ByteCopy/3000-7970_4-76177783.htmlHow to Extract Subtitles from Blu-ray Disc?Step 1. Load Blu-ray sourceDownload the extract converter for Mac and lunch it, put Blu-ray disc into your Blu-ray drive and then plug the Blu-ray drive into the computer through its USB cable. Click "File", from its drop-down list, select "Load from disc" to import Blu-ray disc to the program.
 Step 2. Select SRT subtitle.Find the “Format” menu, and select “Subtitle File” from its drop-down list. There is a options of the box-“SRT Subtitle(*.srt)”
Step 3. Start extract.Hit the big red “Convert” and let it start extracting *.srt subtitles. Wait for a moment, open your file destination (or click “Open output folder” to locate generated files), you will get all the subtitles in English, Italian, Spanish… Which is exactly the same as in your original disc. For this situation, you could could one or some of them you need.More Guides:
There’s a 99% chance you can’t watch 3D Blu-ray movies on 3D TV, but a powerful 3D Blu-ray Ripper can change that, and here’s why. If you have a 3D TV and a bunch of 3D Blu-ray discs, you can find out what you need to get working by reading the article.
As we know, 3D movies have joined people's daily life for a couple of years. The number of 3D consumers is increasing constantly, and 3D videos are becoming the most sought-after things. Instead of going to the cinema, many people prefer to enjoy their 3D blu-ray movies on TV to spend their weekends. Maybe most 3D movie fans would ask the same question that how to make your 3D Blu-ray sources playable on your 3D TV? Just like the problem below from a 3D movie fans.
I'm trying to find out if I can rip my 3D blu-ray's to my HDD and still get 3D playback on them to my TV via my HDMI connection. If so, how exactly would I go about burning them (if there is a certain way), and is there any special software or anything I'll need to play the blu-ray's back through to do this? I am using Mac OS X 10.9 Mavericks."
As is know to all, SBS 3D MP4 videos can be best played on 3D TV. The only unsolved problem left is a converter to rip 3D Blu-ray to movies in side-by-side 3D MP4 for 3D TV on Mac. Pavtube ByteCopy for Mac is your best choice which can rip 3D Blu-ray to movies in 3D MP4 for various 3D TV on Apple TV as well as other 3D players like Stereoscopic Player and BenQ W1070 Projector. Besides, it can create 3D videos out of source 2D Blu-rays/DVDs to enable users watch movies in 3D on any 3D devices with ease. With it, you also can adjust bit-rate, frame rate, 3D mode and depth according to your own need. Just follow the steps and show you how to rip 3D Blu-ray to 3D MP4 for watching on 3D TV. Other Download:- Pavtube old official address: http://www.pavtube.cn/bytecopy-mac/- Cnet Download: http://download.cnet.com/Pavtube-ByteCopy/3000-7970_4-76177783.htmlHow to rip 3D Blu-ray to 3D SBS MP4 for watching on 3D TVStep 1. Import 3D Blu-ray sources video filesInsert your 3D Blu-ray to your Mac, run 3D Blu-ray to 3D TV Converter and click "Load" to import.3D Blu-ray sources video files. An internal or external Blu-ray drive is required to recognize your 3D Blu-ray disc.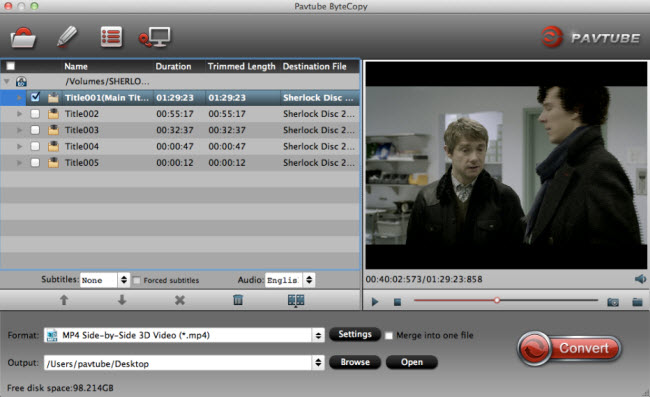 Step 2. Choose compatible video formatClick the format bar to follow "3D Videos" and choose the 3D Side-by-Side MP4 format which is most compatible with 3D TV.
 Step3. Set profile.Click "Settings" to adjust bitrate, frame rate, 3D mode and depth according to your own need.
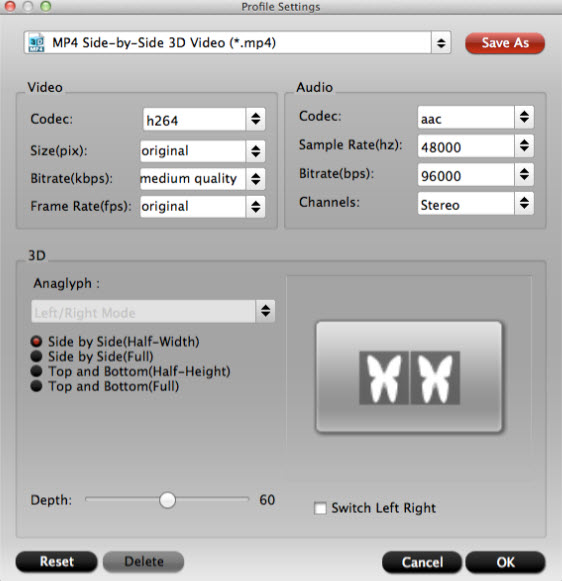 Step 4. Start converting 3D Blu-rayClicking the “Convert” button on main interface and get the 3D Blu-ray to 3D SBS MP4 for 3D TV conversion starts.After conversion, you can click Open output folder to transfer it to your Apple TV or other devices for watching. Read more information about Tips and Guide for HD Video Streaming with Apple TV for help.More Guides:
How to Add SRT Subtitles to MP4 Videos on Mac? Whether you come across these situations: download many MP4 films and TV films on Mac but find there is no subtitle; or your MP4 movies contain subtitles in foreign languages? Both of these break your dream to enjoy the MP4 movies on your Mac. Don’t worry. You can add right and suitable SRT subtitles to your MP4 moves on Mac. SRT subtitle maybe is the most basic subtitle formats. SRT format is supported by most video players and subtitle creation programs. It is a text file not an image file that you can edit it and merge it with desired movie file so that you can display subtitles when you play video file on Mac. Add SRT subtitles to MP4 video on Mac is very easy. You even don’t need to re-encode the video if you don’t need to change MP4 to other video formats. When you add SRT subtitle to MP4 video on Mac, you should prepare:[/size] 1: The right SRT subtitles matching up with your MP4 movies. You can download it from Moviesubtitles.org or create it on your own on Mac. If you decide to make SRT subtitle, here is the steps: a. Open Notepad, WordPad or other text editor. b. Edit subtitles shown as below:  c. Save subtitles to SRT format. In Notepad, please click menu File->Save As, change file name to “xxx.srt”, set “Save as type” to “All Files”, and then set “Encoding” to "ANSI" or “UTF-8”.( "ANSI" means English subtitles while “UTF-8” stands for non-English )
  Tip: SRT subtitle should contain four parts: a.A number indicating which subtitle it is in the sequence. b. The time that the subtitle should appear on the screen, and then disappear. c. The subtitle itself. d. A blank line indicating the start of a new subtitle. 2. A SRT to MP4 merger for Mac Pavtube iMedia Converter for Mac is recommended to you. This SRT to MP4 merger for Mac not only helps to merge SRT subtitle with MP4 file on Mac but also supports adding external subtitles (SRT/ASS/SSA) to h.265, M3U8, AVI, FLV, MKV, WMV, MOV, MP4 and any other mainstream video formats within a few clicks. (Read review) Free download and install Other Download: - Pavtube old official address: http://www.pavtube.cn/imedia-converter-mac/ - Cnet Download: http://download.cnet.com/Pavtube-iMedia-Converter/3000-2194_4-76177788.html If you are a Windows user, you can read this: How to add SRT subtitles to video on Windows. How to add SRT subtitles to MP4 with SRT to MP4 merger on Mac?[/size] Step 1: Load video files to the software Click “File” menu, and select "Add Video/Audio" to import source MP4 videos.
 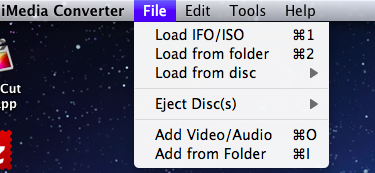 Step 2: Set video format If you don’t need to change your MP4 video to other video format, you can click “Format” > “Common Video” to choose MP4 format your films originally are. Step 3: Add SRT subtitle to MP4 video Click the “Edit” icon on the tool bar of main interface. On the “Video Editor” Window, you can play and preview the original video and output effects. Click “Subtitle” icon. In this tab, you can add SRT subtitle files to the MP4 video as hard subtitles. Tick “Enable” and click “Browse”. Choose your SRT file on your Mac computer.
 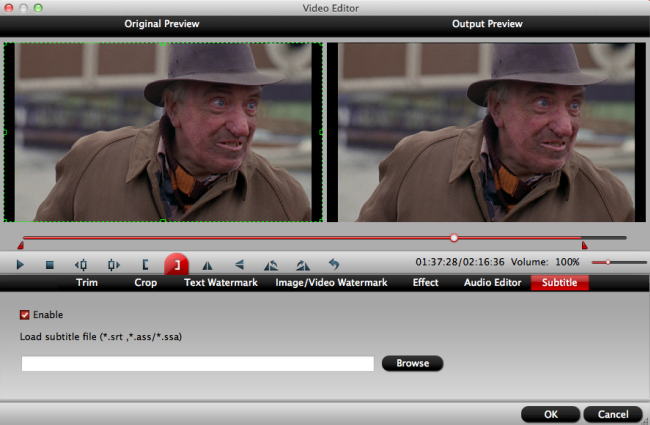 Note: Please make sure that the names of the MP4 videos and the SRT file are matched. For instance, if the movie file is saved as "Jurassic World.mp4" , you must ensure the name of the subtitle file to be saved in "Jurassic World.srt". Step 4: Start converting Before start converting, you can preview the video on the preview window. Then click “Convert” to start merging SRT file with MP4 videos. Finally, you merged SRT subtitle to MP4 videos n Mac. Now you can enjoy your movie with subtitles. Please notice, adding external subtitles to video on Mac is just one function of iMedia Converter for Mac. Related Article:[/size]
Src:How to Add SRT Subtitles to MP4 Videos on Mac?
Note: Please make sure that the names of the MP4 videos and the SRT file are matched. For instance, if the movie file is saved as "Jurassic World.mp4" , you must ensure the name of the subtitle file to be saved in "Jurassic World.srt". Step 4: Start converting Before start converting, you can preview the video on the preview window. Then click “Convert” to start merging SRT file with MP4 videos. Finally, you merged SRT subtitle to MP4 videos n Mac. Now you can enjoy your movie with subtitles. Please notice, adding external subtitles to video on Mac is just one function of iMedia Converter for Mac. Related Article:[/size]
Src:How to Add SRT Subtitles to MP4 Videos on Mac?
YouTube (owned by Google) is the most popular online video sharing site at present with over 1 billion (1,000,000,000) visitors per month in average. It enables people to post videos online for sharing with thousands of millions of people of the world within a few minutes. For Apple users, most people did not yet have a clear idea of uploading iTunes videos to Youtube. There are some more important information available for you before you solve this issue. The first is what the feature of iTunes Movies, TV shows and music videos? Briefly, they are all copy protected by Apple's Fairplay DRM technology. We can't do anything more except watch the iTunes purchased or rented videos with Apple products, like iTunes, iPhone, iPad, iPod, Apple TV etc. The second is what video formats are supported by YouTube for uploading? YouTube accepts videos uploaded in most formats, including AVI, MKV, MOV, FLV, MPEG-4(.mp4), MPEG, WMV, etc. As the most recommended YouTube upload video format, MP4 overlaps all the advantages with small file size, high compression rate (for high quality) and popularity, which includes two video Codecs, namely, MPEG4 and H.264, which are both widely supported, together with AAC (2 Channel - 8 Channel) and MP3 as audio Codec. What should we do if we want to upload clips from iTunes videos to Youtube? It's easy with Pavtube ChewTune, which adopts an unique DRM decrypting technique to strip DRM off from all video downloaded from iTunes, besides, you can convert both DRM-ed and non-DRM video to all popular video/audio formats, here we choose MP4, in order to upload video to Youtube. Below steps will help you a lot. 
 How to Upload iTunes DRM M4V Videos to Youtube? Step1. Load iTunes video Click "File" menu, and select "Add Video/Audio" or "Add from Folder" to import iTunes video.
 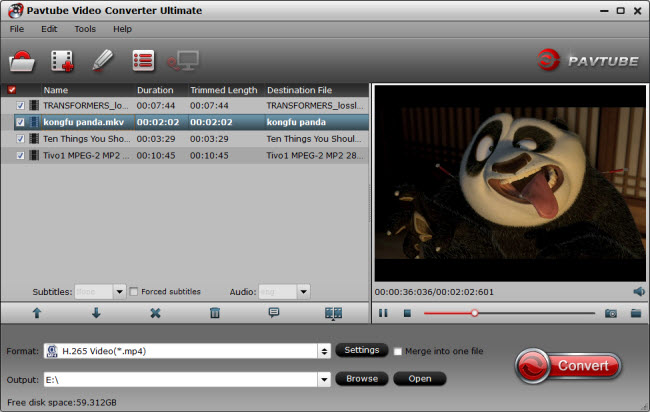 Step2. Set output format Clicking the Format bar, you can choose MP4 as the output format from the format list
Step3. Start producing DRM-free files
Click the "Convert" button to get the conversion started. After the conversion, you can click Open output folder and upload it to Youtube directly. More Guides:
Src:How to Upload iTunes DRM M4V Videos to Youtube
