DVDs to iTunes on Windows or Mac OS

Summary: Want to know how to import all Kinds of DVDs files from Mac/PC to your iTunes Library easily? This article provides the easy way. 


How to rip a DVD to digital video format on a Windows computer or on Mac OS X ? Have trouble in importing MP4, MOV, AVI, VOB, Tivo, DIVX, MPEG, FLV, MVI, MKV, 3GP, WTV and more video files in iTune for playing? and how to convert these DVD to iTunes video format for playback or sync to ios devices, Apple TV? The following article will show you the best and fastest way to rip DVD to video and convert DVD movies to iTunes format.

In many ways, a person's DVD collection represents an extensive investment. Naturally, there's the amount of money spent to acquire it, but there's also the essentially collective nature of the medium. DVDs are not being constantly produced, and to lose a rare or difficult-to-find disc can be a severe inconvenience. Given the value placed on our collections and the inherent difficulty in replacing certain favorites, it's not surprising that many people have taken to using DVD copy software to back up their DVD collections.

iTunes, on one hand, is a media player app to play audios and videos, and on the other hand, a media library to download and manage digital music and video files on PC that runs alternatively on OS X or Windows OS, as well as on iPhone, iPad and iPod touch.

Add unsupported DVD video to iTunes Library 

Reason One : iTunes doesn't natively support AVI, VOB, Tivo, DIVX, MPEG, FLV, MVI, MKV, 3GP, WTV, etc as input formats.

Reason Two: Though Apple announced to support MP4, MOV, M4V, we still encounter issue when adding them into iTunes Library since these formats are container formats which may contain codecs that are not compatible with iTunes.

Reason Three: If the file is an unprotected WMA file and you have Windows Media Player Series 9 or later installed, iTunes makes a copy of the file and adds it to your iTunes library. The original WMA file remains unchanged. You can't add protected WMA files or protected WMV files to iTunes.

How to Rip my DVDs to iTunes

If you want to enjoy music or movie on your Apple devices like iPhone, iPod, iPad and Apple TV, the first thing you need to do is to sync videos and audios from your iTunes library to your devices. ITunes is a media player computer program, used for playing, downloading, and organizing digital music and video files on desktop or laptop computers. iTunes could only recognize video files in MP4, MOV, M4V, etc. which means if you want to copy DVD movies to iTunes Library, you should rip DVD to iTunes playable videos before you can sync DVDs to iTunes for playback.

Why choose Pavtube DVDAid Mac to convert DVD to iTunes supported format? The answer is simple. DVDAid to iTunes converter provides good quality output regardless of the end device that you are going to use. It converts DVD to any format supported by iTunes in simple steps. Besides, you can crop the black bars, add special video effects, split or merge videos, etc. as you like with the built-in editor. Just get it and rip videos from DVD disc to iTunes supported videos for playback on device, etc. in just a few mouse clicks!

To do this you’ll be using DVDAid software (Review). They make the best DVD ripping & copying software out there. It’s by far my favorite — very easy to use, fast, and high quality. The first thing you want to do is click the link at the below for a free trial download of this software. That link will start an instant download of this program. Download and install the application from the link above, and you’ll be able to try it out for free. If you like it you can register and buy for the full version right from the program itself.


Other Download:
- Pavtube old official address: http://www.pavtube.cn/dvd_ripper/
- Cnet Download: http://download.cnet.com/Pavtube-DVDAid/3000-7970_4-76158510.html

Simple and Effective Way to Rip my DVDs to iTunes

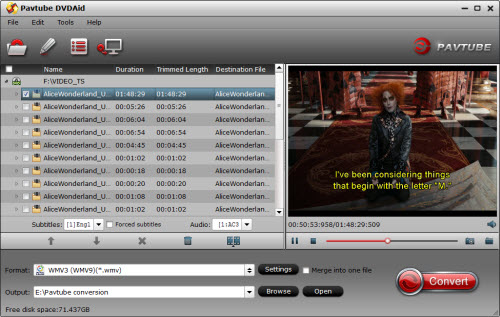
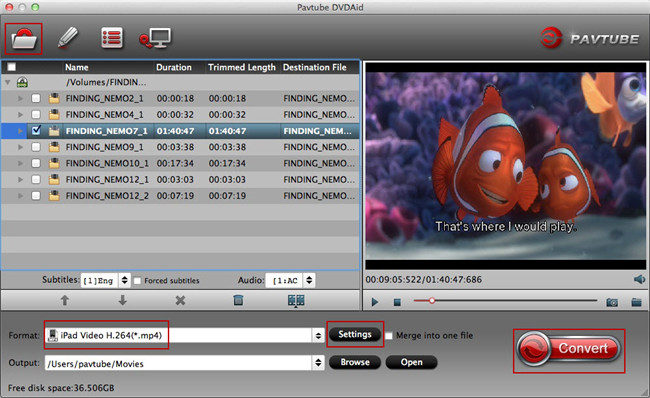
Step 1. Please insert your DVD disc to DVD drive, just click the “Load DVD” in the top menu “File”, or load DVD folder files by click “Load DVD Folder” , then you can import DVD into DVDChef software for converting.


Step 2. Select iTunes friendly formats and output folder

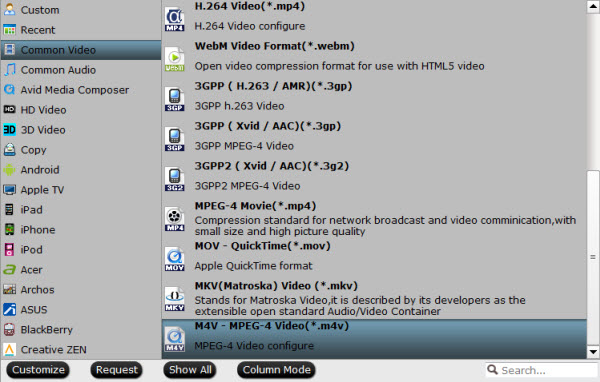
After you have successfully completed loading your DVD, select the output format and folder. The video formats available are M4V, MP4 or MOV. In this case, we shall select MP4 format from the common video choices only for description purposes. If you do not have a ready folder, you can choose an output path as the destination folder to save the converted movie.
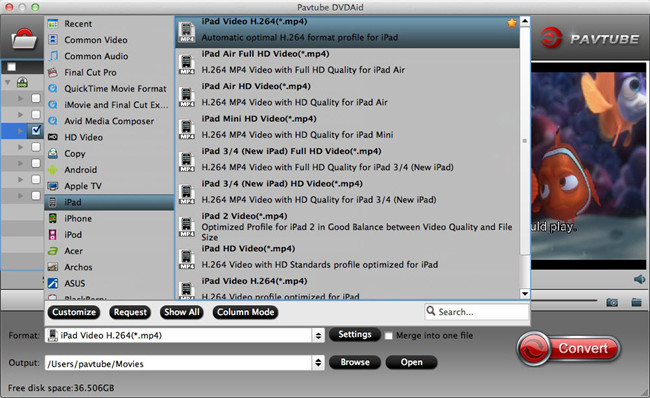


iTunes Supported Format:

iTunes can support the following audio and video files, AIFF (AIFC, audio CD, MP3, System 7 Sound (SND), uLaw (AU), WAV, QDesign, QuickTime audio (audio only movies) AAC (Advanced Audio Coding) as well as MP4. When it comes to video, Apple has allowed iTunes to read only one video format, which includes MPEG-4 (.mp4, .m4v). Meaning you can only convert your DVD to MPEG-4 for you to play them on iTunes.

Step 3. After all things done, you need to do is click the “Converter” button in the bottom right, and it will start copying the DVD movie to your computer. This might take some time. However, it is important to note that the conversion time depends on the size of the DVD movies.
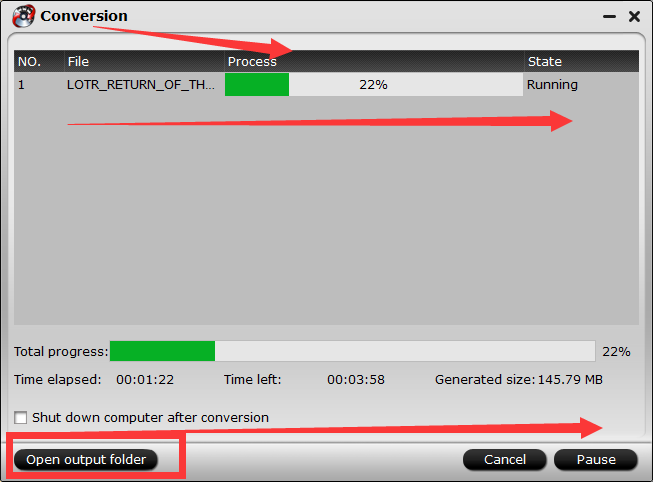


If the transfer is successful you can further transfer the DVD to your iPad Air, iPad Mini 4, iPad 3, iPhoen 7, iPhoen 6, iPhone 6 plus, iPhone 5S, Apple TV 3 and other portable devices and you can easily enjoy them everywhere you wish to.

That, my friends, is how to put DVDs onto iTunes — the absolute best way to do it. Go ahead and give that a try. Enjoy having your favorite DVDs in iTunes and any Apple devices now!

iTunes Supported Importing Format

Want to add or play your video/audio files via iTunes but failed? Check out the supported file formats of iTunes at first.

iTunes Supported Video Formats
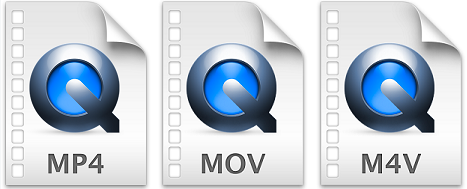


According to Apple, iTunes supports any video format that works with QuickTime and files purchased or downloaded from iTunes store. That means if your video files have a .mov, .m4v, or .mp4 file extension, generally you can play them in iTunes. However, there are also limitations on video codecs, sample rate, etc. So if your .mov, .m4v or .mp4 files are rejected by iTunes, that may be because of a codec problem.

iTunes Supported Audio Formats
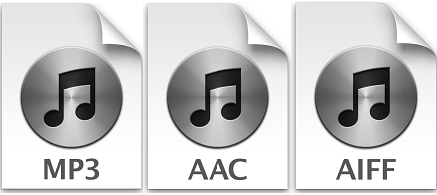


iTunes supported audio formats include: MP3, AAC, AIFF, WAV, Audible .aa files and iTunes purchased M4A and M4P music files. iTunes can convert between MP3, WAV, AAC, AIFF, Apple Lossless.

Add supported video to iTunes Library

Requirement: iTunes (the latest version iTunes 12.3.3 is recommended); iTunes Store account; Internet access (if necessary)

Note: Before importing or adding videos to iTunes, you need to check if the format of the video you want to add is supported by iTunes. Beyond that, you should also make sure the files can be played in QuickTime (not all .mp4 files will play in Quicktime, for example).

Right-click on the video you want to check and select "Properties" (Windows) or "Get Info" (OS X).
Look for the "Type of file" or "Kind" entry. If the file is an .mkv, .wmv, or .avi file, it will need to be converted.
Test the file in QuickTime. If the file is a supported format, load it up in QuickTime to make sure it plays. If it doesn't play, you'll need to convert it.
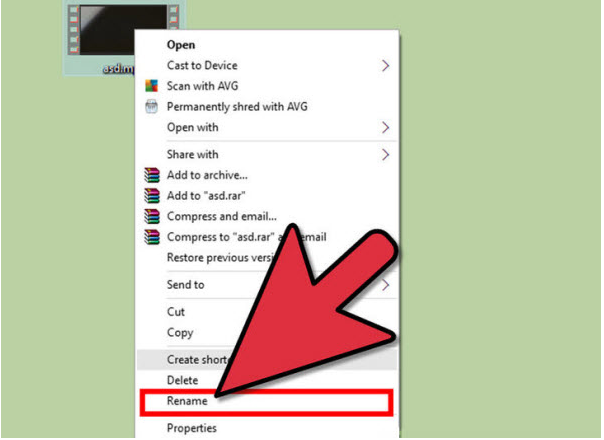
1.Rename any video files with multiple periods in the name. Oftentimes videos downloaded from torrents will have multiple periods in the name to denote who ripped and encoded the video. Remove any of these extra periods, as they can cause problems when trying to import into iTunes. Right-click on the file and select "Rename" to edit the name.


2. Launch iTunes. Make sure that you are running the latest version.

3. Import the video. Click the File menu (Windows) or iTunes menu (OS X) and select "Add File to Library" (Windows) or "Add to Library" (OS X). Browse for the converted video and select it.

If you are using Windows and don't see the File menu, press the Alt key.
You will not receive any error or confirmation when adding a video file.

For Windows:
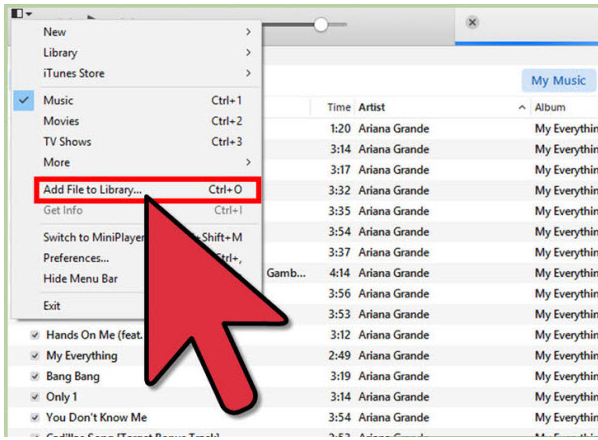


For Mac:


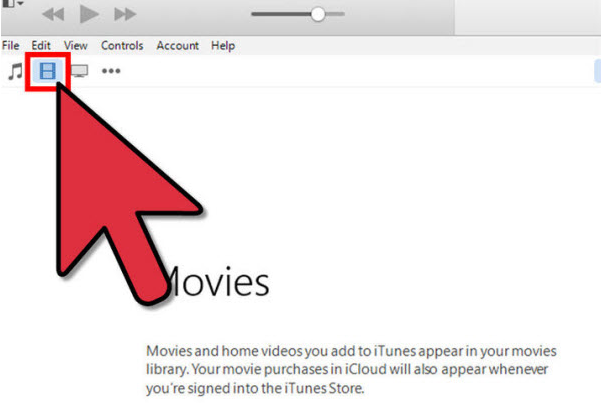
4.Click the "Movies" button. This is located in the row of buttons along the top of the iTunes window, and looks like a film strip.


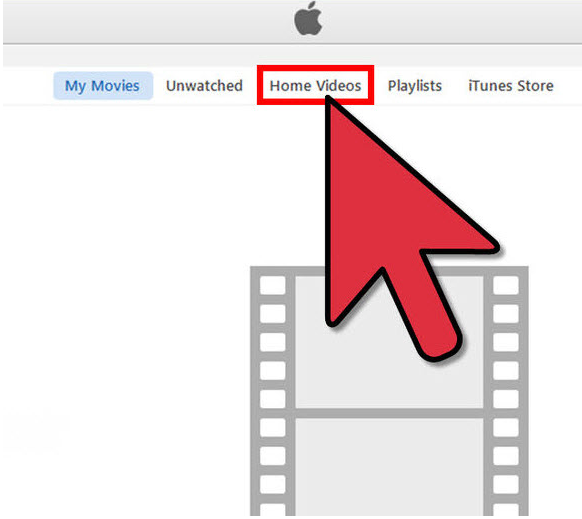
5.Click the "Home Videos" tab. Any movie you import will be added as a "Home Video". If you don't see the video that you just imported, it wasn't properly converted to an iTunes-compatible format.


6. Move the video to your "Movies" or "TV Shows" library. It can be difficult to find the video you want if they're all sorted into the "Home Video" library. Moving them to the proper spot will make it easier to watch or sync the videos later.

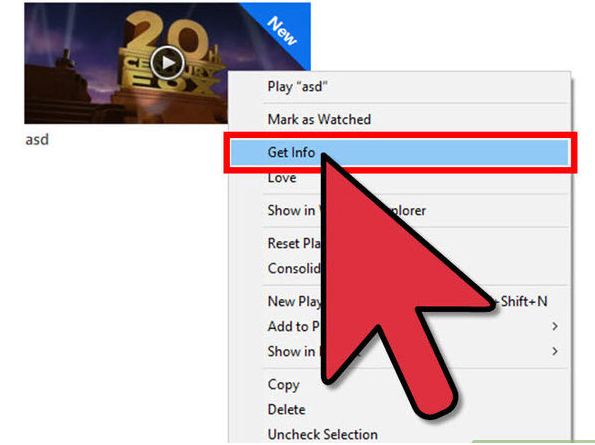
Right-click the video and select "Get Info".
Click the "Options" tab in the window that appears.
Click "Home Video" next to "media kind" to select the library that you want to move it to.
Click OK to save the changes. You will now be able to find the video in the proper library.


7.Sync your movies to your iOS device like iPad, iPhone, iPod, Apple TV, etc. Now that the files are in iTunes, you can sync them to your iOS device. Click here for details on syncing.

If the video does not sync to your device, you'll need to create a version in iTunes that your device supports. Click File and select "Create New Version". Select the device that you are syncing the video to, and then wait for the conversion to complete.

By default, adding items to your iTunes library places a pointer to each file in the iTunes folder; the original file remains in the current location. For information about copying files to the iTunes folder instead of creating pointers to them.

Related articles 

Top 3D Blu-ray Copy Reviews


People in the modern world prefer to use blu-ray discs in order to save their important files. Blu-ray Disc won the HD format war finally. They have the potential to save more data and are reliable than DVDs. These unique features have played a major role behind the popularity of blu-ray discs and it can also be considered as an excellent alternative available for usb flash drives. In order to save your data into a blu-ray disc, you need to get hold of a reliable free bluray burner. 

Learn more >>> Top Blu-ray ripping software 

If you already have a Blu-ray player that 3D movies works fine, you don’t need to upgrade. The only features that have been added to Blu-ray players recently, such as screen mirroring and 3D upconversion, are inessential. Your play 3D on TV will already upconvert video as well as any inexpensive player, and there are better ways to get your mobile device’s screen to your TV see 3D movies. 

If you want to add streaming services to blu-ray player, you’re better off getting this one - Pavtube ByteCopy. They support far more blu-ray services, have a better user interface, and are faster to use than other blu-ray player. The features of a Blu-ray player should be considered. 

Free download and install: 


Other Download: 
- Pavtube old official address: http://www.pavtube.cn/bytecopy/ 
- Cnet Download: http://download.cnet.com/Pavtube-ByteCopy/3000-7970_4-76158512.html 

The steps to copy Blu-ray 3D movies 

Step 1: Import video. 

Insert your Blu-ray movie to disc drive, and click “Load from disc” button to load Blu-ray from ROM. For video file, click the “Add video” button, browse to computer hard drive and import video into this app. 


Step 2: Select format and set profile. 

Tap on “Format” bar and find “3D Video”, there are a lot of format options for you. “MP4 Side-by-Side 3D Video (*.mp4)” is recommended for blu-ray player 


Tip: We recommend using 1280x720 HD resolution to encode your videos. Higher resolutions will not provide any better quality, meaning you'll waste space and processing power. 

We also recommend using a higher bit rate than a typical web stream at that resolution, as the pixels in your video will be magnified on the phone's screen. The optimal bit rate is content dependent, and many videos can get by with less, but 5 Mb/s should give good quality. 

While H.264 is the recommended video coding, H.265 videos can also be played. 

3D movies should be encoded “full side-by-side” with a 1:1 pixel aspect ratio. Content mastered at 1920x1080 compressed side -by- side 3D should be resampled to 1920x540 resolution full side -by -side resolution.. 

Step 3: Convert 3D Content to SBS 3D MP4. 

Click “Convert” button, video to SBS 3D MP4 conversion begins. When the process finishes, open the output folder to locate. 


For Mac users who wants to convert 3D content to 3D SBS, the equivalent Mac 3D Convertershould be used. 

Here is a list of some of the most popular 3D blu-ray copy applications that can be found on the Internet. 

Related articles 
srl:http://2d-3d-movie-tips.blogspot.com/2016/06/top-3d-blu-ray-copy-reviews.html

Ripping Blu-ray on my PS3/PS4 with dolby 5.1 audio

Summary: I need help! My "fat" PS3 doesn't have 5.1 Surround when playing "disc based" movies, the PS3 games and Netflix work fine...but Blu-Ray only play two channels!  

”I need help! My "fat" PS3 doesn't have 5.1 Surround when playing "disc based" movies, the PS3 games and Netflix work fine...but Blu-Ray only play two channels! WHATS WRONG?!”


Since PS3, PS4 support Blu-ray playback, they have been the main Blu-ray player for Blu-ray collectors. However, many Blu-ray movies contain 5.1 surround sound audio but many PS3/PS4 users can’t get the 5.1 audio when playing Blu-ray movies like the above question. So how to solve Blu-ray no 5.1 audio in PS3/PS4 playing?

It assumed that the you have Blu-ray Audio Output Format (HDMI) in default [Linear PCM]. You can try changing Blu-ray Dynamic Range Control to [On]. This will improve conversation when playing movies recoded in Dolby audio. You can also try changing Blu-ray Audio Output Format (HDMI) to [Bitstream]. This is my prefer method, I was having an issue not to be able to change the surround decoding to DTS when Linear PCM was selected. My Denon AV receiver kept detecting Multichannel input if Linear PCM was used. if you are using the phat ps3, then lpcm will show multichannel when decoding hd audio. if its not hd audio then lpcm will only play 2 chennels i think.

If this doesn’t work, you can rip Blu-ray to PS3/PS4 supported digital video with multi-track audio keeping 5.1 sound to test if it is the Blu-ray’s or device’s fault with a Multi-track Blu-ray Ripper.

Step 1: Download Multi-track Blu-ray Ripper - Pavtube ByteCopy below. It can rip and convert Blu-ray to MP4 with multi-track audio for PS3/PS4 quickly.

Free download and install:
 

Step 2: Run the multi-track Blu-ray Ripper <review>and click “File” to load Blu-ray discs.


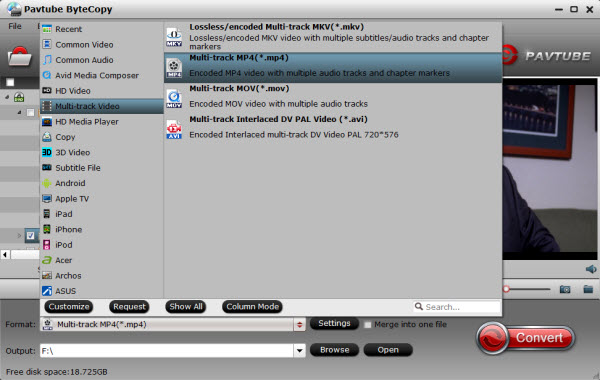
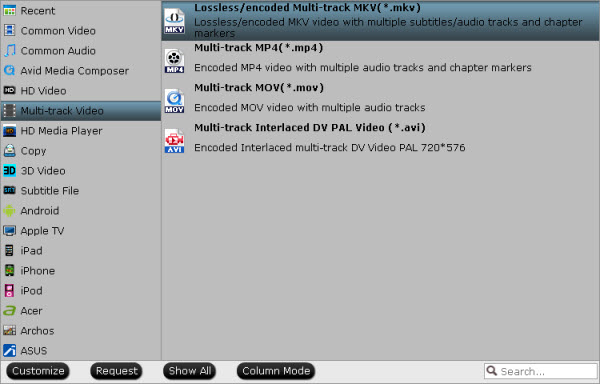
Step 3: In the dropdown list of Format menu, you can find several MP4 options for output. Here we recommend "Multi-track MP4 (* mp4)" under "Multi-track Video" catalogue. Because it will save multiple video, audio and subtitle tracks form original Blu-ray in output MP4 and you won't suffer any quality loss.


Note: Make sure the original BD disc does contain Dolby TrueHD audio, otherwise you still can't get Dolby TrueHD 5.1 audio saved.

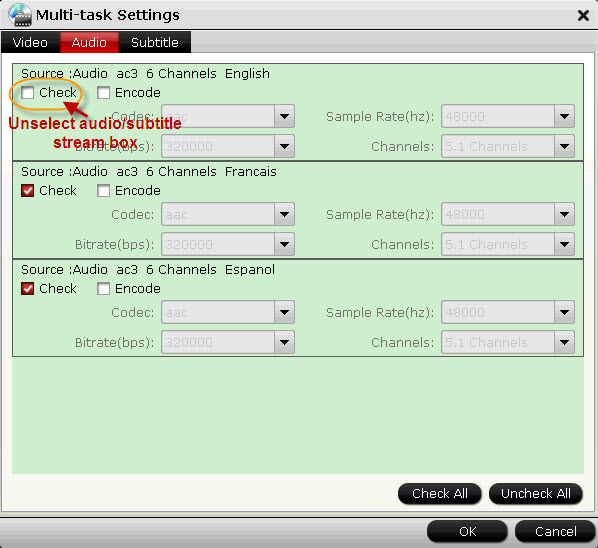
Step 4: You can check the audios you want to keep and uncheck the audios you don't need. It all depends on your own choices. And then choose 5.1 audio in the Audio - Channels box.


Step 5: Double check above steps, click the big “Convert” button and start to convert Blu-ray to multi-track MP4 with 5.1 sound for PS3/PS4 with ease. When the conversion is done, open the output folder and find the converted multi-track MP4 file.

Use the multi-track MP4 with 5.1 sound to test your PS3/PS4. If in this case, your PS3/PS4 can stream 5.1 surround sound, it may be your Blu-ray discs’ fault.


Related articles 

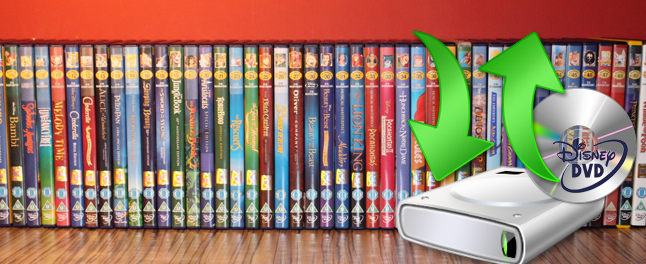
Copy Disney Copy-Protected DVD Movies for Your Kids


Rip and Backup Disney Copy-Protected DVD Movies for Your KidsDo you have bought some Disney DVD movies for your kids and want to backup them in case of future carelessness break? Are you going to buy the latest Disney DVDs for enjoying on phones or tablets with your kids when camping? Need a DVD ripper to help youdecrypting and ripping Disney copy-protected DVDs? The answer is in the below article. 

The Walt Disney Company has released and planned to release many fantastic animation movies like “Monsters University”, “Planes”, “Frozen”, “The Good Dinosaur”, “Big Hero 6”, etc and you may collect a pile of Disney DVDs. However, the Disney DVDs have encryption encoded with new copy protection to prevent owners from copying the discs. 

How to judge if your DVDs are protected by Disney Copy Protection System? 

So many movies have been released and most of them are on DVDs. Whether you are suffering from collateral damage of DVDs mishandled, or you meet problems when ripping and making backup of the recently released DVDs, what you need is reliable DVD ripping software. Here we strongly recommended Pavtube ByteCopy (or ByteCopy for Mac) to you. 

Free download and install: 
  

Other Download: 
- Pavtube old official address: http://www.pavtube.cn/bytecopy/ 
- Cnet Download: http://download.cnet.com/Pavtube-ByteCopy/3000-7970_4-76158512.html 

Guide on How to Rip and Backup Disney Protected DVD movies for Your Kids? 

Note: Please respect the copyright law in your country. It is illegal to rip or copy DVDs for commercial use. It is allowed to clone a copy of copyright material for your own use under the concept of Fair Use in most countries. 

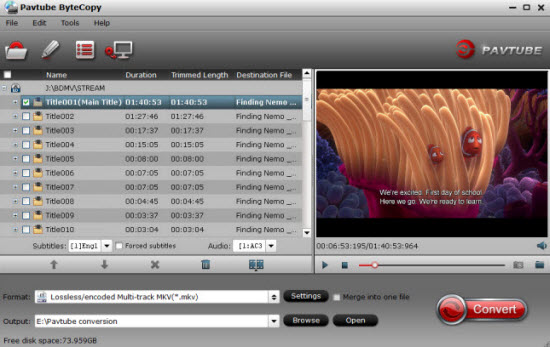
Step 1. Run the Pavtube ByteCopy, insert DVDs in computer DVD-ROM, You can load from DVD driver by clicking “DVD Disc” or from DVD folder, DVD ISO image file. 


After completing movie content loading, this DVD ripper software will analyze your disc and display all the available segments. The app will also automatically choose the recommend title to rip. 

You can backup and convert latest Blu-ray and DVD movies to any other formats like MKV/MP4/MOV with multi-track audios, M4V, AVI, WMV, MPG, M2TS, FLV, etc. for playback on iOS/Android/Windows Tablets/Phones, HD Media Players, 3D/4K TVs and more. 


Step 2. Specify “Output Format” to select target video format; Specify “Output Path” to preserve the converted videos. You may make personal settings before the ripping start. 

Just click Convert Button, and you can do other things before the DVD backup is completed. 

After that, you can watch Disney DVD directly on your computer, or transfer it to your portable devices. 


Useful Tips: 

1. If you want to personalize your DVD movies, this DVD Ripper provides you amazing video editing features like trim, crop, merge function, add subtitles, etc. 
2. If you do not need the keep the multiple audio and tracks and subtitles, Pavtube DVDAid is the professional DVD ripping software for you. It also has the Mac version: Pavtube DVDAid for Mac

ByteCopy($42) + Video Converter Ultimate($65) = Only $79.9, Save $27.1 

ByteCopy($42) + DVD Creater($35) = Only $44.9, Save $32.1 

ByteCopy($42) + MXF MultiMixer($45) = Only $69.9, Save $16.1 

Video Converter Ultimate($65) + DVD Creater($35) = Only $64.9, Save $35.1 

BDMagic($49) + DVD Creator($35) = Only $49.9, Save $28.1 

DVDAid($35) + DVD Creator($35) = Only $35.9, Save $34.1 

ByteCopy($42) + ChewTune($29) = Only $54.9, Save $16.1 

Video Converter Ultimate($65) + ChewTune($29) = Only $74.9, Save $19.1 

BDMagic($49) + ChewTune($29) = Only $49.9, Save $28.1 

DVDAid($35) + ChewTune($29) = Only $49.9, Save $14.1 

Load DJI Osmo 4K video in Premiere Pro CC with easy

Description: If you have trouble in importing or editing DJI Osmo 4K videos in Premiere Pro CC, read here to help you. 

A new shake-free robotic-like camera called Osmo, produced by the drone maker DJI, includes some key features and an affordable price tag, which could make it the next-generation selfie stick. The gadget contains a built-in swiveling camera and high-tech innovative stabilization system that allows for on-the-go videos and selfies in crisp and clear ultra-high definition (UHD) 4K resolution. It connects to iPhones and iPads via Wi-Fi connectivity. Maybe you want to load DJI Osmo 4K videos to Premiere Pro CC, but sometimes that is a little difficult. 

In order to import DJI Osmo 4K video to Premiere Pro CC quickly, we suggest convert DJI Osmo 4K video to better edited by Premiere Pro CC. According to many tests, you can use Pavtube Video Converter Ultimate to help you. With three clicks, you can easily convert any DJI Osmo 4K videos to Premiere Pro CC more friendly videos. Moreover, this ideal converting tool is equipped with basic editing functions including trimming, cropping, adding watermark, removing audio and more. 

Free download and install 


Other Download: 

- Pavtube old official address: http://www.pavtube.cn/blu-ray-video-converter-ultimate/ 
- Cnet Download: http://download.cnet.com/Pavtube-Video-Converter-Ultimate/3000-2194_4-75938564.html 


Efficient Way to Edit DJI Osmo 4K video in Premiere Pro 

Step 1: Load the DJI Osmo 4K video to the program 

Install and run the 4K Video Converter, and then import the source DJI Osmo 4K videos to it. To do so, you can directly drag & drop the files onto the main interface, or you can click the "Add video" icon to locate the videos from your local disk.


Step 2: Set output video format 

Click "Format" pull down list to select Adobe Premiere/Sony Vegas> MPEG-2(*.mpg) as the best video format for Premiere Pro. WMV, MOV formats are the good choice as well. 


Tip: Click the "Settings" button, you are able to enter the "Profile Settings" panel to adjust video and audio parameters for the converted files, including video size, bit rate, frame rate and more.You can keep the original 4K resolution but also can adjust to 2K, 1080p video size just according to your needs. 

Step 3: Begin to convert DJI Osmo 4K video to Premiere Pro 

When you finish the settings, you can press the big "Start conversion" button to kick off the conversion. By using this professional 4K to Premiere Pro Converter, the conversion will be finished with ultrafast speed and the best video quality kept. After the conversion, you can then edit the DJI Osmo 4K video in Premiere Pro CC/CS6/CS5 smoothly. 


More Topics: 


Pavtube Upgraded to Support Blu-ray MKB61

Hot news for Blu-ray collectors!! Are you still upset that you can't rip your new bought Spectre 007, The Martian,The Revenant cause these new Blu-rays now have been encrypted with more complex encryption mechanism MKB61 Now, you are saved by Pavtube in that Pavtube Studio has upgraded his main 3 Blu-ray ripping tools to 4.8.6.7 version to support the new Blu-ray MKB61.


Usually, you perhaps know that Blu-ray is protected by AACS, BD+,UOP,DRM, HDCP, BD-ROM, Region codes, etc. This encryption prevents people from copying, ripping and converting their legally bought Blu-rays even they just rip it for personal use. Normal Blu-ray ripping applications on the market can rip AACS, BD+ schedule but no other difficult encryption mechanism. Even powerful as MakeMKV, supports only Blu-ray encryption up to v60, not including MKB61.
This time, Pavtube upgraded his three top-ranked Blu-ray Ripper BDMagic, ByteCopy, Video Converter Ultimate to the newest 4.8.6.7 version supporting to decrypt new Blu-ray encrypted with AACS, BD+,Region codes, HDCP up to MKB61.Now, let's learn the upgrade and the main features of each Blu-ray ripping tool.

What's new ?

1.support latest Blu-ray MKB61.
2.fix some bugs.

Key features of ByteCopy

- 1:1 backup BD/DVD with original video structure.
- Main title copy BD/DVD with smaller size.
- Copy BD/DVD to MKV with lossless quality.
- Convert BD/DVD to MP4/MOV/AVI with multiple subtitle/audio streaming.
More functions of ByteCopy is in the review.

Key features of BDMagic

- Full copy and directly copy Blu-ray and DVD
- Convert Blu-ray/DVD to SD/HD MP4, MKV, AVI, etc to NASExternal Hard DriveMedia Server, etc.
- Convert 4K Blu-ray to H.265/HEVC 4K MP4/MKV
- Rip Blu-ray preserving AC3, AAC, DTS audio in stereo, 5.1, 7.1 sound.
More functions of BDMagic is in the review.

Key features of Video Converter Ultimate

- Decrypt Blu-ray and DVD to virtually any SD/HD video
- Convert 4K Blu-ray to SD/HD MP4, WMV, MOV, QuickTime, ProRes for editing in NLE.
- Copy Blu-ray/DVD to M3U8 for HTTP live streaming
- Convert, shrink, compress Blu-ray, DVD to YouTube, FaceBook, Vimeo, Instagram, Google Plus, etc.
More functions of Video Converter Ultimate is in the review.

The Blu-rays you can Decrypt:

You can use Pavtube Blu-ray Ripper to decrypt some new released Blu-ray including: The RevenantThe MartianHannibal TV Series, Game of Throne (1-6), Spectre 007Zootopia, Harry Potter, Independence Day, The Divergent Series: AllegiantThe WalkAvatarHouse of Cards, Bridge of Spies, Mad Max: Fury Road, Room, Spotlight, X-Men: Apocalypse, The Family Fang, Ben Hur, Roots, Code of Honor, Now You See, Finding Dory, Arch Angels, Shchedrin: The Secret Life of Pets, Sherlock, Ghost Rider / Hellboy, The Da Vinci Code, Pete's Dragon, Ice Age: Strong and Proud, Star Wars: The Force AwakensLondon Has FallenFifty Shades of Grey, Kingsman-The Secret Service, etc.
What's more, Pavtube Studio is holding on Summer Vacation Promotion. Buy Blu-ray Ripper in this period, you may get some surprise:
In addition, Pavtube Studio also upgraded his Video DVD Converter Ultimate to support users to rip any new released commercial DVD discs to MP4, MOV, MKV, 3GP for using on iPad Pro, iPhone 6S, Galaxy S7/S7 Edge, HTC 10, Nexus 6p, Xperia Z6, etc.
Src: Read more

How to Convert DVD to MKV in H.264/H.265 codec Easily?

For DVD collectors, it is convenient for them to rip their DVD to popular video formats to play on the portable devices. However, there are too many video formats for you to choose. Here, I suggest you to convert DVD to MKV in H.264/H.265 codec. 

Reasons for converting DVD to MKV in H.264/H.265 codec? 

1.a complete movie in a single file, including many audio, video and subtitles streams. 

The MKV format is capable of holding unlimited number of video, audio and subtitle tracks, along with any metadata. Practically this means it is possible to put an entire movie with multiple sound and subtitle tracks and movie thumbnail into single MKV file. 

2.Lossless video and audio quality can be retained. 

MKV is a container format that supports various codecs, including H.264, H.265, VC-1 etc. The MKV in H.264/H.265 codec format makes it possible to keep original video or audio compression format when copying DVD movie to MKV files. 

PS.: If your devices support H.265 format, you’d better convert DVD to MKV in H.265 codec, which can keep a high quality with a small video size. But if your devices do not support H.265, then, h.264 format is also a good choice for you to enjoy a high-quality movie. 

How to convert DVD to MKV in H.264/H.265 codec? 

Similar to Blu-ray, DVD is also equipped with variety of protections to prevent DVD content from being illegal use. So, in order to convert DVD to MKV in H.264/H.265 codec, you have to use a DVD ripper to realize the conversion. Here, an award-winning DVD Ripping tool called Pavtube DVDAid is recommended to you.(review

The program outflanks its competitors with many remarkable functions. It can convert DVD not only to MKV in H.264/H.265 codec with no quality loss, but also to other popular file formats or multimedia playback device optimized file formats. The program also boasts with other bonus features. As for subtitle aspect, your DVD movies may contain many subtitle tracks in multiple languages, you can select one from your original DVD movies as your desired subtitles. You can also check “Forced subtitles” option so that you only see subtitles when the actors are speaking a different language. 

Free download and install: 
  

Other Download: 
- Pavtube old official address: http://www.pavtube.cn/dvd_ripper/ 
- Cnet Download: http://download.cnet.com/Pavtube-DVDAid/3000-7970_4-76158510.html 

Steps to convert DVD to MKV in H.264/H.265 codec 

Step 1. Load DVD disc 

Insert DVD disc and then launch the app. Click "Load from disc" button to browse to disc drive and import DVD into this app. The program checks the title of main movie automatically, and you can simply choose language of audio and subtitles for output and check in preview window. 


Step 2: Set output format 

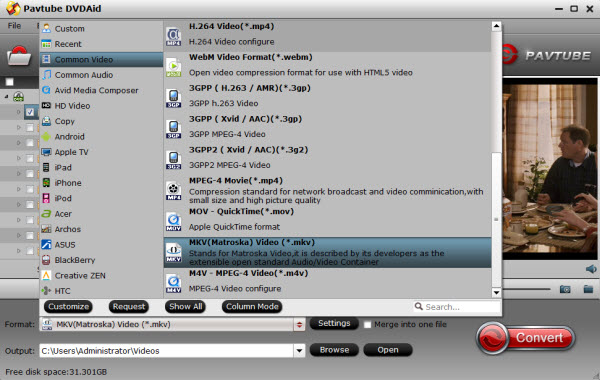
Select “MKV(Matroska) Video (*.mkv)” as output format from “Common Video” category under the drop-down list of “Format”.  


Tips: If you want to get better HD video quality, just select “MKV HD Video (*.mkv)” from “HD Video” category. 

Step 3: Customize MKV in H.264/H.265 codec 

Click "Settings" to pop out "Profile Settings" window, set output video codec to H.264/H.265. Besides, you can also adjust size, bitrate, frame rate according to your own needs. 

Step 4: Start to convert 

Back to the main interface, hit right-bottom “Convert” button to carry out the conversion process. After the conversion, hit the “Open output folder” on the main interface to get the converted DVD files from the program. Now, your can enjoy your DVD movies on your portable devices. 

Now, come to Pavtube Christmas Coupon and you can get the app at a big discount. 

Related Articles:[/b]