Put/Stream Blu-ray movies onto Apple TV with forced subtitles

Summary: Want to make Blu-ray portable on Apple devices with preserving forced subtitles? This article mainly introduces the way to put Blu-ray on Apple TV with forced subtitles. 

We like surfing, email, ebay, remote work, reading, watching movies on our IOS devices iPad2, iPad3, iPad mini, and also on Apple TV. Now I have Blu-Ray which I wanted to view via my AppleTV and store on my media drives. I hope to be able to set Forced subtitles, and write directly out to Apple TV format. Is there any way? 

Indeed, you can not play Blu-rays directly on your Apple devices like Apple TV. To make Blu-ray portable with Apple TV, the answer is to rip Blu-ray to Apple TV compatible videos so you can transfer them for smoothly playback. 

What's more, some Blu-ray contains the unknown language like Avatar and you cannot understand it without subtitles. So how to keep the subtitles for full Blu-ray enjoyment on Apple TV? In this case, Pavtube Blu-ray Ripper is the ideal software to you. It will help to rip and convert Blu-ray to Apple TV friendly MP4 format with fast speed and high video quality. Moreover, you can choose the desired subtitle for output and select forced subtitles for some unknown languages. Now let's go to learn how to do it. 


How to convert Blu-ray to for Apple TV with forced subtitles? 

Get your Blu-ray drive ready and insert Blu-ray you need to the drive. And keep networked when ripping Blu-ray. 

Tips: If you are running on Mac, please try Blu-ray Ripper for Mac

Step 1. Load Blu-ray to Blu-ray to Apple TV Converter. 

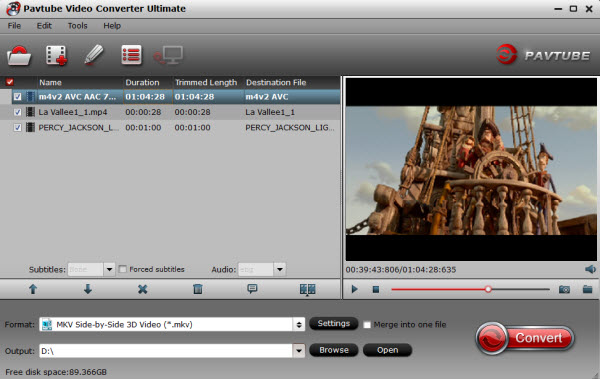
Run the best Blu-ray to Apple TV Converter, click "Load file" button to select the inserted Blu-ray and import it for transferring to iTunes. It will take only few seconds to rip Blu-ray. Then the software will recognize the actual main title of Blu-ray and pick it automatically. You do not need to look for the main title manually. 

Press the selected main title you can preview the whole Blu-ray movies on the preview window on the right, which works like a media player. 


Step 2. Check forced subtitles for output. 

Because Blu-ray always contains multiple subtitle and audio tracks, you can go to choose the desired subtitle and audio on the interface for output. 

Beside subtitles option, "Forced subtitle" is optional and uncheck by default. Go to check "Forced subtitles" for output. Take note that it will output forced subtitles only if it is checked. 

Step 3. Choose Apple TV compatible format. 

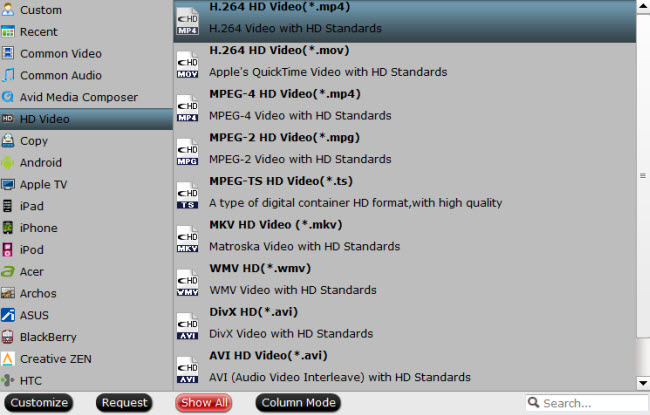
Choose "Format" dropdown list and go to "Apple TV" options to find "Apple TV H.264 (*.m4v)". This format is best for playing on Apple TV. 
Tips: For some advances users, you can go to adjust video and audio parameters like bitrate, resolution, channels, etc. Click "Settings" button you can go to check and change them as you like. 

Step 4. Convert Blu-ray to Apple TV. 

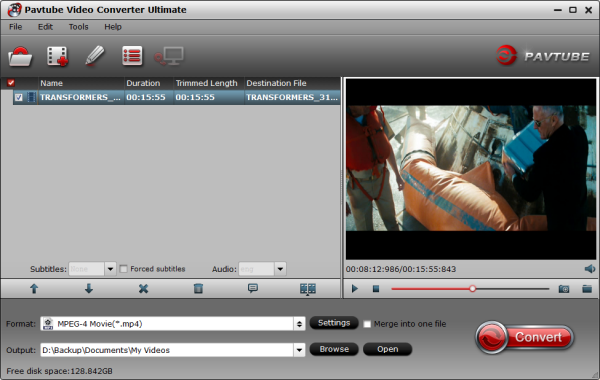
Before conversion you can go to "Browse" your computer to find the folder for output files. Then click "Convert" button to get Blu-ray to Apple TV conversion started. After a while, you can find the generated file for Apple TV quickly via "Open" button. In this way, you can enjoy your favorite Blu-ray with forced subtitles on your Apple TV wherever you are. 


More 


Freely Watch Halloween Blu-ray Movie on Mac/Windows 
How To Play H.265/HEVC On Roku 3/4 Without Any Hassle? 
How do I get a Samsung Galaxy Tab 3 Kids Edition to preference the SD card? 
Watch 1080p MKV/AVI/M2TS/ movies on Sony BRAVIA HDTV via USB 
Play H.265 video files on the new Apple TV 3 freely 
How to keep the original DTS HD-MA audio track from Blu-ray Disc? 
Copy Blu-ray/DVD for playing on Samsung Smart TV via usb-hard drive 
Store Blu-ray/DVD on HTPC with 5.1 audio Via Mac OS X El Capitan 


Src 
Put/Stream Blu-ray movies onto Apple TV with forced subtitles 

Play 4K/HD Videos and Movies to Surface Hub Tablet on Windows 10

Are you fond of watching 4K or HD videos? Read this article to find out the way of playing 4K/HD Videos and Movies to Surface Hub Tablet on Windows 10 smoothly. 

Microsoft Surface Hub - It is an 84-inch tablet giant being packed with a 4K screen resolution and a 55-inch version with HDTV resolution, will run Windows 10 apps, both have capacitive touchscreen displays (like your smartphone). Given the irresistible trend of 4K UHD, we'd like to show you here how to watch 4K movies on Surface Hub, instead of how powerful the Surface Hub works. What’s the Top 4K/HD Video Converter for Surface Hub Tablet? Keep scrolling and you will get the full answer you need.


Part I: Where to Get and Free Download 4K UHD Movies for Microsoft Surface Hub?

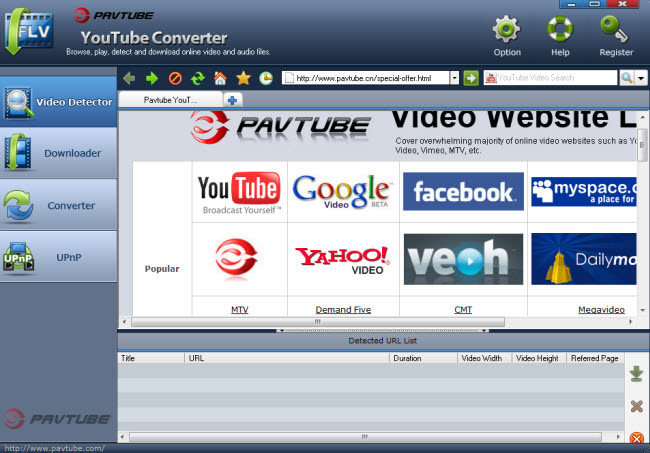
Thus, watching online 4K movies on Surface Hub may be stutter. But good news is that you can have a fluent viewing if you download 4K movies and play them on Surface Hub offline. So you need the Pavtube 4K YouTube Converter (Win & Mac).

This 4K YouTube Downloader is simply the fastest YouTube downloader to save anything from YouTube, so that you can watch YouTube videos on Mac, PC, iPhones, iPads, iPod, Android devices at any time. It is able to download 1080p and 720p HD videos in minutes and convert YouTube videos to popular formats for various use.


Part II: Step-by-step guide on Convert 4K/HD Videos and Movies to Surface Hub Tablet on Windows 10

The first thing you should be aware of that an up-to-date Video to Surface Hub Converter is needed if you want to play your 4K/HD Videos and Movies on the new Windows 10 device - Surface Hub. Here, Pavtube Video Converter Ultimate (Read the review) is highly recommended. This is the Top HD/4K Video Converter and editor which could be functional in all HD/4K videos to Surface Hub conversion. As an H.265/HEVC decoder, it can also convert H.265 video to Surface Hub supported format for playback on Windows 10. For Mac users, turn to iMedia Converter for Mac.

Step 1: After the successful installation, click “Load file(s)” or “Add video” to load video file you want to convert in your PC into the program. It supports batch conversion, you can you can add movies in different formats like HD/4K videos at one time.


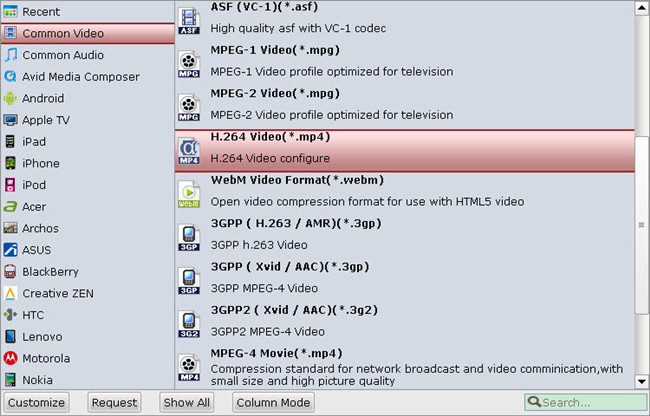
Step 2: When you click the “Format” bar to come to the output list, as we mentioned above, we can suggest you to choose the “Microsoft Surface Windows RT/Pro H.264 Video (*.mp4)” as the best output one for Surface Hub. For others? You can drop down the list and find more. And the video/audio parameters can be reset in “Settings” to achieve a satisfying playback in for Surface Hub.


Step 3: Hit the big button “Convert” to get the cork started. If you follow several steps mentioned above, after easily transferring files to Surface Hub tablet, we can enjoy the HD/4K videos nicely with high definition. Would you like to have a try?

Tips: How to Troubleshoot Insufficient Space for Storing 4K Movies on Surface Hub?

It is known to all that 4K movie file size is very big. The first 4K movie you can download is 160GB. It really requires massive space to save 4K movies. Check the 4K movie storage suggestions below.

1.Stream 4K movies from computer/PC to Surface Hub.

This solution requires you to download 4K movies on your computer, and then stream 4K movies from computer to Surface Hub. Thus, you can watch 4K movies on Surface Hub without occupying memory. Wireless Projection enables users to share their Windows desktop to the Surface Hub both wired and wirelessly.

2.Compress 4K movies to fit for Surface Hub with minimum quality loss.

If you want to store 4K movies on Surface Hub with relatively less storage, Pavtube Video Converter Ultimate can also help compress 4K movie size to fit for Surface Hub with minimum quality loss or realize both conversionand compression of Fraps videos. Only several mouse clicks are required: load downloaded 4K movies -> select output profile for Surface Hub -> settings changes ->hit Convert to begin compressing -> once finished, simply transfer the compressed 4K movies to Surface Hub.

Note: Click “Settings” near the format bar to go to “Profile Settings” interface. Compress your Fraps video to a smaller size than the original one by clicking “Size” dropdown list under “Video” option.

Now, you can enjoy the 4K/HD Videos and Movies to Surface Hub Tablet on Windows 10 for entertainment. Please feel free to share this tutorial if you think it is helpful!


More

How to use iPhone 6 Video with FCP X in High Quality on Mac 
Backup DVD To Plex For Watching On Tablet/Laptop/Mobile
Convert DVD ISO/IFO image files to Kindle Fire HD for playing smoothly
Convert Video to iPad Pro/Mini 4 Supported Video Formats
How Can You play online/downloaded YouTube video with Roku?
Rip Blu-Ray To Plex Server To Set Up Home Theater
Which Audio and Video Formats Are Supported by iPhone 6
Get a Galaxy Grand/2 Video Converter to Score Yourself


Src
Best Video Solution

Play home movies from VHS on Windows Media Player Smoothly

Perhaps you too have a VHS tape (or stack of them) that you want to transfer to your Windows Media Player for playing. If so, this column might help you out. It describes the steps I took to transfer the video from the VHS tape to Windows Media Player on my computer, edit the video and then burn the edited video to a DVD. I also include some time-saving tips that I discovered along the way. 


Here show the supported video and audio files of Windows Media Player in a table: 
File type (format)File name extension
CD audio.cda
Intel Indeo video technology.ivf
Audio Interchange File Format (AIFF).aif, .aifc, and .aiff
Windows Media audio and video files.asf, .asx, .wax, .wm, .wma, .wmd, .wmv, .wvx, .wmp, and .wmx
Windows audio and video files.avi and .wav
Windows Media Player skins.wmz and .wms
Moving Picture Experts Group (MPEG).mpeg, .mpg, .m1v, .mp2, .mpa, .mpe, .mp2v*, and .mpv2
Musical Instrument Digital Interface (MIDI).mid, .midi, and .rmi
AU (UNIX).au and .snd
MP3.mp3 and .m3u
DVD video.vob
From the table we know that the VHS type video and audio files are not included. There is another way to get though this issue. In order to watch and play the VHS video on Windows Media Player, first you should convert the VHS files into Windows Media Player supported format like the normal mp4. Pavtube Video Converter Ultimate could give you a lot help, it can rip the VHS files into the any Windows Media Player supported format in the table. What's more, this all-inclusive program is a HD video converter as well, and you can feely convert TiVo, MXF, MOV, and other HD videos to almost all formats. Besides, it is a professional video editing software to assist users with trimming, cropping, splitting, merging, attaching subtitles...to create your own videos. 


Other Download: 
- Pavtube old official address: http://www.pavtube.cn/blu-ray-video-converter-ultimate/ 
- Cnet Download: http://download.cnet.com/Pavtube-Video-Converter-Ultimate/3000-2194_4-75938564.html 


Other Download: 
- Pavtube old official address: http://www.pavtube.cn/imedia-converter-mac/ 
- Cnet Download: http://download.cnet.com/Pavtube-iMedia-Converter/3000-2194_4-76177788.html 

Play home movies from VHS on Windows Media Player Smoothly 

Step 1. Load VHS files. 

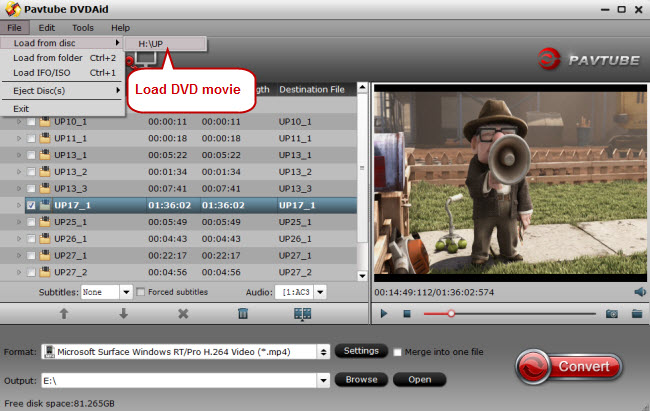
Run Pavtube Video Converter Ultimate on PC, and click “File” to follow “Load from folder” and find the VHS files you put into the computer. 


Step 2. Choose Windows Media Center supported video format 

Then click the format bar under the video file list to find “HD Video.” Under “HD Video” item please find the output video formats compatible with Windows Media Center according to the form listed above. 


Step 3. Start QuickTime MOV to WMP conversion 

Before performing the conversion, you can edit your VHS files and set the best audio and video parameters for the output target files. Then click “Browse” in main screen to decide which folder you’re going to save the converted VHS files. At last, just one click “Convert” to get conversion from VHS to Windows Media Player started. 


More 
How Can You play online/downloaded YouTube video with Roku? 
Rip Blu-Ray To Plex Server To Set Up Home Theater 
Which Audio and Video Formats Are Supported by iPhone 6 
Get a Galaxy Grand/2 Video Converter to Score Yourself 
Ripping DVD to Apple TV for playback on Onkyo receiver and Panasonic TV 
Enjoy Christmas 2D/3D Blu-ray on PS4 When Staying at Home 
How to View iTunes Movies via Kodi? 
Top 6 Free Online/Desktop MP4 to MOV Video Converter 

Src 
Play home movies from VHS on Windows Media Player

Watch 1080p MKV/AVI/M2TS/ movies on Sony BRAVIA HDTV via USB

Why can't you get 1080p MKV/AVI/M2TS video to Sony Bravia HDTV for USB playback? Are you seeking for a solution? This article will explains. 

Sony Bravia TV is one of the most reputable, well built HD TV lines on the market, it supports to play movies via USB port, which is great, USB port solution free you free the cable clusters and the expense for storing blu-ray discs.

Though Sony TV like Bravia enables us to enjoy video files from a USB device, it has video format limitation. It only supports videos in MPEG-1, MPEG-2, MP4, WMV, ASF, DivX HD through USB. If you have a collection of movies in format like MKV, AVI or M2TS, naturally, the solution is to convert these videos into the right format Sony Bravia supports for USB playback first.

To cater to all the video lover's need, the following will introduce a step by step guide on how to transcode 1080p MKV/AVI/M2TS to Sony Bravia supported video format effortlessly.

What you need:

1. USB mobile hard disk or flash disk. The disk file systems should be FAT12, FAT16, FAT32, or exFAT for Sony TV acceptable.

2. Video Converter software. To convert current MKV/AVI/M2TS videos to be supported by Sony Bravia HDTV, Pavtube Video Converter Ultimate is needed to convert any HD or SD video format to Sony Bravia HDTV friendly format- MPEG-4 MP4. (Here is top Ultimate Converter reviews) It provides optimized preset for playing HD video on Sony Bravia HDTV without scarifying image quality. 3D effect on converted video is also supported by this program.

Guides on converting 1080p MKV/AVI/M2TS Videos to MP4 for playing on Sony Bravia HDTV via USB

Step 1. Free download Pavtube Video Converter Ultimate, install and launch the program.

Once you run it, click "Add Video" button to load the videos you'd like to convert. When all the videos are loaded to the program, you can preview the videos.


Step 2. Select best supported format by Sony Bravia HDTV.

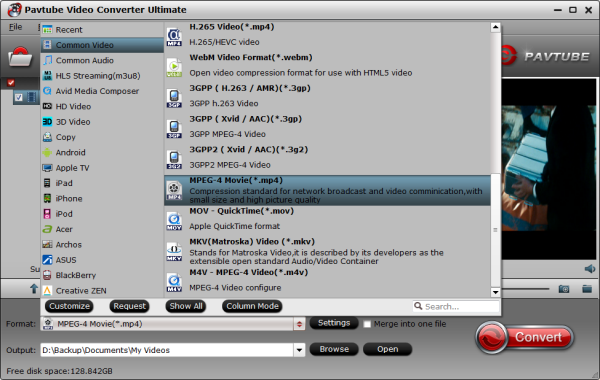
Click on "Format", and select output format from the drop-down list. Simply follow "Common Video -> MPEG-4 Movie(*.mp4)" which is accepted by Sony Bravia HDTV.


Tip: If you want to get 3D movies for your 3D TV, choose "3D -> MP4 Side-by-Side 3D Video (*.mp4)".

Step 3. Settings.

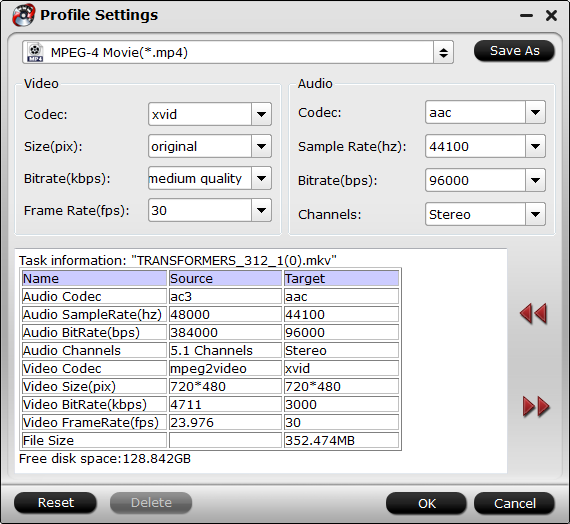
You can customize the A/V parameters based on your personal requirements. Adjust the resolution, bitrate, frame rate or codec to meet your requirement by clicking "Settings".


Step 4: Start converting 1080p MKV/AVI/M2TS video to Sony Bravia HDTV.

After the above steps are done, you can click "Convert" button to convert your MKV/AVI/M2TS Video to Bravia HDTV MP4 format.

Pavtube Video Converter Ultimate supports batch conversion so you may load multiple videos and convert at one time. You may also merge them into one file by checking the box "Merge into one file" before conversion starts. Mac version is here.

Sony HDTV Video Converter support TVs:


HBR 4K Ultra HD TV, LED HX850/HX750 serice Internet TV, XBR HX950 Internet TV, LED EX640/340/645 serice Internet TV, LCD BX450/330 serice HDTV etc.

After conversion you can click "Open" button to get the generated mp4 files. Copy converted movie files onto USB or USB Flash Disk and plug it into the Sony Bravia HX/EX/BX/HBR HX series HDTV and fall back on the couch and enjoy.

How to tranfer converted movies to Sony BRAVIA LED HX850/HX750 Internet TV?

1. Through an USB

You can connect your movable equipment (iPad, iPhone, Galaxy S2/S3, Sony Xperia S/P/U, HTC One X etc.) and TV via USB. Let TV read these video files.


2. Via USB Flash Disk.

You need to transfer the movies to USB Flash Disk first. Then, insert the USB Flash Disk into USB interface.


If you are disc lovers, you can rip Blu-rayDVD and ISO files to play on your TV.


More

How Can You play online/downloaded YouTube video with Roku?
Rip Blu-Ray To Plex Server To Set Up Home Theater
Which Audio and Video Formats Are Supported by iPhone 6
Get a Galaxy Grand/2 Video Converter to Score Yourself
Ripping DVD to Apple TV for playback on Onkyo receiver and Panasonic TV
Enjoy Christmas 2D/3D Blu-ray on PS4 When Staying at Home
How to View iTunes Movies via Kodi?
Top 6 Free Online/Desktop MP4 to MOV Video Converter


Src

Watch 1080p MKV/AVI/M2TS/ movies on Sony BRAVIA 


How to View iTunes Movies via Kodi?

XBMC, officially renamed to Kodi on 1 August 2014, is a free and open-source media player software which allows users to play and view most videos, music, and podcasts from online services and all common digital media files from local and network storage media. If you’re would like to create a home theater system to enable media sharing among all of our digital devices, there will be a trouble that you are not able to play the movies downloaded from iTunes Store via Kodi. In this guide, you can learn how to play iTunes DRM M4V to Kodi player on Mac and Windows. 


Apple protects the media contents from iTunes Store with DRM which makes it impossible to view iTunes movies via Kodi. So, the best way to get Kodi play iTunes movie is to remove DRM from those M4V movies. To accomplish this goal, Pavtube best DRM Converter and Removal - ChewTune is highly recommended for its easy-to-use interface, straight workflow and reliable video quality. It can easily get rid of Apple’s DRM protection from those iTunes downloaded m4v video, and transfer it to various video formats including MP4 profiles for Kodi. (Here is the review).

The Video Formats Kodi (XBMC) Supports:

To better play iTunes DRM M4V via Kodi, we have to know what's the video format the Kodi supports at first.

Kodi as a common used Add-on tool for many online streaming websites like PrimeWire, IceFilms and Project Free TV etc., it can support most common video formats including MPEG-1, MPEG-2, H.263, MPEG-4 SP and ASP, MPEG-4 AVC (H.264), HuffYUV, Indeo, MJPEG, RealVideo, RMVB, Sorenson, WMV, Cinepak.

Step by Step Guide on Converting iTunes DRM M4V for Kodi Player

Step 1. Download Pavtube ChewTune as the Best DRM removal software.

  (Click here for Mac OS X 10.5)

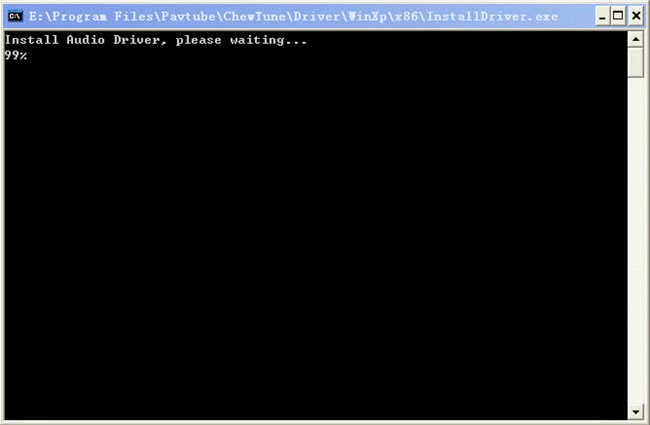
There would be a command window pop up during the installation to install specific soundcard drive for DRM Removal, please do not shut down it and let it running until the installation completed.


Step 2. Run Pavtube ChewTune, drag and drop the source iTunes video and music from local computer to ChewTune. Or hit the “Add Video” button to import your iTunes DRM contents.


Step 3. Let’s click the drop-down-list besides “Format” and move to “Common Video” column and choose “H.264 Video(*.mp4)” as output format for your Kodi.


Step 3. You can click “Settings” to enter Profile Settings window and customize target video spec, you can find settings for video size, codec, bitrate and frame rate.

Step 4. Click the big “Convert” button on software main UI to start iTunes to Kodi conversion. After the conversion completes, you may find the iTunes movies in MP4 format and add them to XBMC as freely as you like.

Tips:

1. The DRM removing process may mislead your anti-virus software to falsely report virus/worm. Please ignore the report to keep on ripping.

2. This product cannot convert unplayable video (damaged, unauthorized, etc).

After that, you can directly play the movie on your PC or you can stream the movie to your HDTV for playback with families and friends via Kodi home theater system.


More
Stream XviD/Divx files to Apple TV for watching
Stream ISO Files to Roku 3 via Plex: Rip ISO to Roku 3 Readable Formats Firstly
Find my Data Back from Water Damaged iPhone 6
How can I Get DVDs movies on Samsung Galaxy TabPRO 8.4
Rip Blu-ray movies to Kindle Fire HD 8.9 for watching with best video quality 
Enjoy Christmas 2D/3D Blu-ray on PS4 When Staying at Home
How to Play Sony Handycam 3D MTS on 3D TV with 3D Effect?
Src
How to View iTunes Movies via Kodi 

Decrypt Copy Protected DVD American Sniper to MP4 for iPad/iPhone/Android

Learn to decypt DVD American Sniper and 1:1 backup copy DVD American Sniper DVD full movies to computers, iPhone, iPad, game consoles etc. with the top DVD ripper for Amercan Sniper. 

American Sniper movie on DVD has region code embedded on them( region code 1: US and Canada), making the free open source Handbrake rip 99 title DVD, or find no valid source problems, etc. If you are willing to spend some money on DVD American Sniper decryption, the whole process will be much easier and faster. Pavtube DVDAid has proved to be surprisingly robust and enables you to 1:1 copy DVD American Sniper with zero quality loss instead of "near original" quality. 


Decrypt Copy DVD American Sniper to DVD, computers, iPhone, iPad, iPod, Android 

Freeware are not suggested to adopt because they are available only when facing home-made DVDs with no encryption tech, like Handbrake, DVD shrink and more. American Sniper, same to other 2015 new movie DVDs, is well protected by special DVD copyright protection tech. That is to say, you should figure out the functional DVD ripping tool to rip common commercial movie DVDs, such as Fifty Shades of Grey, Into the Woods,Jurassic World, etc. 

Pavtube DVDAid (review) has been tested to decrypt DVD American Sniper region code with no sweat. The DVD Ripper for American Sniper can bypass all region code(1-6) automatically without further ado. With the help of the best DVD decrypter for American Sniper, you can: 

1. Copy DVD American Sniper to ISO image for later burning to DVD with "Clone DVD to ISO Image" mode. American Sniper DVD to ISO copy is 1:1 full DVD copy with all the movie content and original quality remaining. 

2. Decrypt and rip American Sniper DVD to computers, hard disc, USB effortlessly for a digital backup of fragile DVDs and more convenient playback. 

3. Rip American Sniper full movie on DVD to iPhone, iPad, iPod, Samsung, HTC, game consoles and other portable devices with unchanged quality for on-the-go HD DVD movie playback. With frequent update, iPhone 6/Plus, Galaxy S6/Ege, iPad Mini 3/Air 2, to name just a few, the newest mobile devices are all supported by the Amercan Sniper DVD decrypter. 

4. Decrypt and copy DVD American Sniper to digital format MP4, AVI, MOV, WMV, M4V, etc. to watch the DVD movie on media player like QuickTime, VLC, edit movie on iMovie, Final Cut Pro, with 6x faster speed thanks to the DVD ripper for American Sniper built in Hyper Threading. 

Now, free download it now and follow the below steps to convert “American Sniper” DVD to your devices with ease. If you are using a Mac, you can use the equivalent Pavtube DVDAid for Mac to help you upload “American Sniper” DVD movies to Any Devices on Mac (including El Capitan and Yosemite). 

Step-by-step Guide on How to Rip “American Sniper” DVD to Any Devices on Windows 10 with Ease 


Other Download: 

- Pavtube old official address: http://www.pavtube.cn/dvd_ripper/ 
- Cnet Download: http://download.cnet.com/Pavtube-DVDAid/3000-7970_4-76158510.html 

Step 1: Import American Sniper DVD 

Insert American Sniper DVD disc to DVD-ROM and tap DVD Disc button on navigation bar to import it. You can take ISO image or DVD folder as movie source as well. 


Note: Tick the “Only show forced subtitles”box, then after conversion the DVD movies will be present only showing forced subtitles as you like. Besides, the powerful American Sniper DVD Ripper can allows you to select the preferred subtitles according to your need. 

Step 2: Set desired output video format 

Click the “Format” drop-down list to select “H.264 High Profile Video(*.mp4)” from “Format” drop-down list which is supported by your devices. 


Step 3: Edit video files before converting (Optional) 

Click Edit button, you can realize editing videos like trim video, crop video, rotate video; add subtitles/effects/watermark and more. 

Step 4: Compress video to a small size (Optional) 

Just click “Settings” to manipulate video & audio parameters to set video Encoder,Frame Rate and Bit Rate. 

Step 5: Start Converting American Sniper DVD 

When all these settings are ready, you can click the “Convert” button to begin ripping “American Sniper″ DVD to your iPads or iPhone and Android etc. When the ripping is done, you can click on “Open” button to locate the ripped videos. 

Now, you’re able to playback American Sniper on your computer or iPhone/iPad/Android devices, ripping and copying DVD American Sniper is a task which must be solved as quickly as possible. 


More 

Stream XviD/Divx files to Apple TV for watching 
Backup Blu-rays to Plex Media Server for streaming to Xbox One 
Find my Data Back from Water Damaged iPhone 6 
Stream TV recordings (Tivo shows) to Samsung Galaxy Tab 4 for playback 
How to fix top 5 Apple TV Common issues? 
View DVDs on HD TV for Playback via Mede8er Multimedia Player 
Enjoy Christmas 2D/3D Blu-ray on PS4 When Staying at Home 

Src 
Decrypt Copy Protected DVD American Sniper to MP4 

Can I Keep iTunes Rental Movies Forever on my Computer, Tablet or Phone?


Want to watch iTunes rented movies in a longer time? Follow this article to learn how to remove DRM protection from iTunes Movies and keep your iTunes rentals forever. 

As we know, people who rent movies from iTunes library must know that there is one-month validity for rented iTunes M4V videos to play. Once the rental or watch period expires, the movie will disappear automatically from your iTunes library. Really a pity! Have you ever thought you could watch the movie for more times in a longer time? Then is there any way to crack iTunes rented movie time limitation and keep iTunes rental forever so that you can enjoy the movies anytime you like? 


Of course, that is absolutely possible. Pavtube ChewTune can easily do it for you, which is an excellent iTunes video converters to bring convenience to Windows and Mac customers who are used to purchasing video files from iTunes store. With it, you can can convert rental iTunes movies easily and keep any iTunes video, including rentals, on any place like mobile device, media player, memory card forever! Mac version is here.


How to Keep iTunes Rental Movies Forever with Pavtube ChewTune 

Step 1. Click “Add Video” or "Add from folder" button and Load your iTunes M4V video to iTunes DRM Media Converter. You can either browser to file location or drag and drop source iTunes file to the app. 


Step 2. Next step, choose an output video format for watching on Computer, Tablet or Phone. Just click the drop-down-list besides "Format" and move to "Common Video" column and choose "H.264 Video(*.mp4)". 


Step 3. If you necessary, you could set video and audio parameters such as video and audio codec, bitrate, frame rate, etc so that better video and audio quality can be transferred to your devices. 

Step 4. OK, now you’re ready for rented iTunes movie converting process by clicking “Convert” button. When the conversion completes, click “Open” to get the converted DRM-free MP4 video clips. Then connect your Computer, Tablet or Phone and transfer iTunes movies for enjoying without time & format limitation anymore! 

Also you can convert iTunes Rented Movie to keep on iPad Air, iPad Mini and iPads and iPhone 6, iPhone 6 plus, iPhone 5S/5C forever or stream to wii for watching. 


More 

How to Stream MKV Video to Chromecast for Playback 
Get started to Stream Video from PC to Roku using Plex Media Server 
Enjoy all high definition media contents on iPhone 6 Plus 
Painlessly Convert MKV, AVI, VOB, WMV, Tivo, MP4, FLV Video to iPhone 6 for Enjoying 
Play Rented 3D Movies with Apple TV on Mac OS X El Capitan 
Stream Videos from NAS to PS3 via DSLR for playback 
Which Budget Consumer Virtual Reality Headset Should You Buy? 
Convert and Play downloaded 3D Movies on 3D TV 

Src 
Can I Keep iTunes Rental Movies Forever on my Computer