How to Add SRT Subtitles to MP4 Videos on Mac? Whether you come across these situations: download many MP4 films and TV films on Mac but find there is no subtitle; or your MP4 movies contain subtitles in foreign languages? Both of these break your dream to enjoy the MP4 movies on your Mac. Don’t worry. You can add right and suitable SRT subtitles to your MP4 moves on Mac. SRT subtitle maybe is the most basic subtitle formats. SRT format is supported by most video players and subtitle creation programs. It is a text file not an image file that you can edit it and merge it with desired movie file so that you can display subtitles when you play video file on Mac. Add SRT subtitles to MP4 video on Mac is very easy. You even don’t need to re-encode the video if you don’t need to change MP4 to other video formats. When you add SRT subtitle to MP4 video on Mac, you should prepare:[/size] 1: The right SRT subtitles matching up with your MP4 movies. You can download it from Moviesubtitles.org or create it on your own on Mac. If you decide to make SRT subtitle, here is the steps: a. Open Notepad, WordPad or other text editor. b. Edit subtitles shown as below:  c. Save subtitles to SRT format. In Notepad, please click menu File->Save As, change file name to “xxx.srt”, set “Save as type” to “All Files”, and then set “Encoding” to "ANSI" or “UTF-8”.( "ANSI" means English subtitles while “UTF-8” stands for non-English )
  Tip: SRT subtitle should contain four parts: a.A number indicating which subtitle it is in the sequence. b. The time that the subtitle should appear on the screen, and then disappear. c. The subtitle itself. d. A blank line indicating the start of a new subtitle. 2. A SRT to MP4 merger for Mac Pavtube iMedia Converter for Mac is recommended to you. This SRT to MP4 merger for Mac not only helps to merge SRT subtitle with MP4 file on Mac but also supports adding external subtitles (SRT/ASS/SSA) to h.265, M3U8, AVI, FLV, MKV, WMV, MOV, MP4 and any other mainstream video formats within a few clicks. (Read review) Free download and install
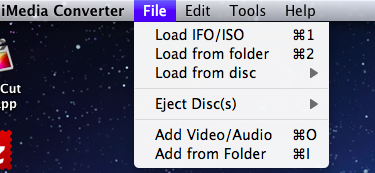
 Other Download: - Pavtube old official address: http://www.pavtube.cn/imedia-converter-mac/ - Cnet Download: http://download.cnet.com/Pavtube-iMedia-Converter/3000-2194_4-76177788.html If you are a Windows user, you can read this: How to add SRT subtitles to video on Windows. How to add SRT subtitles to MP4 with SRT to MP4 merger on Mac?[/size] Step 1: Load video files to the software Click “File” menu, and select "Add Video/Audio" to import source MP4 videos.
  Step 2: Set video format If you don’t need to change your MP4 video to other video format, you can click “Format” > “Common Video” to choose MP4 format your films originally are. Step 3: Add SRT subtitle to MP4 video Click the “Edit” icon on the tool bar of main interface. On the “Video Editor” Window, you can play and preview the original video and output effects. Click “Subtitle” icon. In this tab, you can add SRT subtitle files to the MP4 video as hard subtitles. Tick “Enable” and click “Browse”. Choose your SRT file on your Mac computer.
 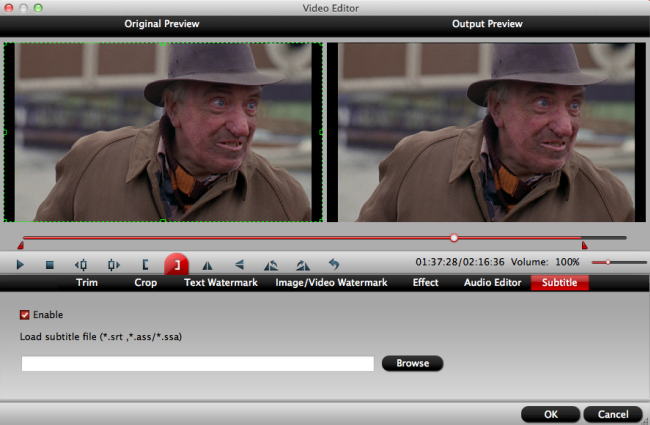 Note: Please make sure that the names of the MP4 videos and the SRT file are matched. For instance, if the movie file is saved as "Jurassic World.mp4" , you must ensure the name of the subtitle file to be saved in "Jurassic World.srt". Step 4: Start converting Before start converting, you can preview the video on the preview window. Then click “Convert” to start merging SRT file with MP4 videos. Finally, you merged SRT subtitle to MP4 videos n Mac. Now you can enjoy your movie with subtitles. Please notice, adding external subtitles to video on Mac is just one function of iMedia Converter for Mac. Related Article:[/size]
Src:How to Add SRT Subtitles to MP4 Videos on Mac?
YouTube (owned by Google) is the most popular online video sharing site at present with over 1 billion (1,000,000,000) visitors per month in average. It enables people to post videos online for sharing with thousands of millions of people of the world within a few minutes. For Apple users, most people did not yet have a clear idea of uploading iTunes videos to Youtube. There are some more important information available for you before you solve this issue. The first is what the feature of iTunes Movies, TV shows and music videos? Briefly, they are all copy protected by Apple's Fairplay DRM technology. We can't do anything more except watch the iTunes purchased or rented videos with Apple products, like iTunes, iPhone, iPad, iPod, Apple TV etc. The second is what video formats are supported by YouTube for uploading? YouTube accepts videos uploaded in most formats, including AVI, MKV, MOV, FLV, MPEG-4(.mp4), MPEG, WMV, etc. As the most recommended YouTube upload video format, MP4 overlaps all the advantages with small file size, high compression rate (for high quality) and popularity, which includes two video Codecs, namely, MPEG4 and H.264, which are both widely supported, together with AAC (2 Channel - 8 Channel) and MP3 as audio Codec. What should we do if we want to upload clips from iTunes videos to Youtube? It's easy with Pavtube ChewTune, which adopts an unique DRM decrypting technique to strip DRM off from all video downloaded from iTunes, besides, you can convert both DRM-ed and non-DRM video to all popular video/audio formats, here we choose MP4, in order to upload video to Youtube. Below steps will help you a lot. 
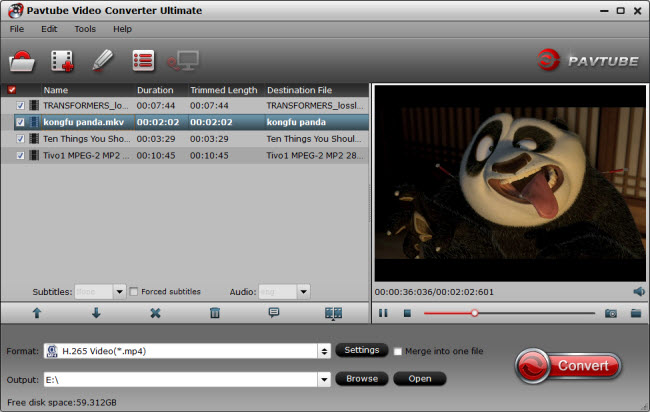
 How to Upload iTunes DRM M4V Videos to Youtube? Step1. Load iTunes video Click "File" menu, and select "Add Video/Audio" or "Add from Folder" to import iTunes video.
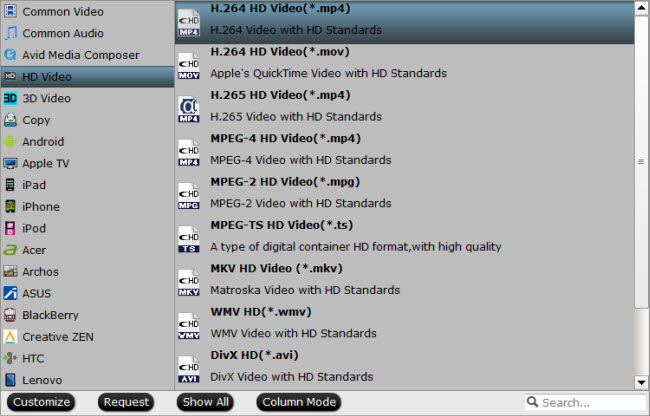
  Step2. Set output format Clicking the Format bar, you can choose MP4 as the output format from the format list
Step3. Start producing DRM-free files
Click the "Convert" button to get the conversion started. After the conversion, you can click Open output folder and upload it to Youtube directly. More Guides:
Src:How to Upload iTunes DRM M4V Videos to Youtube
Rip and Copy DVDs movie to Samsung Galaxy Note 5 on PC and Mac Samsung Galaxy Note 5 will be released today. Note 5 or 2 k will be equipped with 5.7 inch screen, Exynos 7422 eight core processor, 4 gb of RAM + 32 gb ROM, 16 million pixel cameras and 4100 mah battery. From the exposure of the Samsung GALAXY Note 5 boxes, its positive carry the name of the machine and the capacity of the 32 gb, while on the back of the bearing of the specifications of the main configuration information, such as support for LTE 4 g network, equipped with 64 eight core processor, a 5.7 -inch 2 k resolution display; Loading front-facing camera has 5 million pixels and 16 million pixels main camera, and support the optical image stabilization. Our software will be updated in a timely manner. This article will guide you How to Rip and Copy DVDs movie to Samsung Galaxy Note 5 on PC and Mac From Samsung Galaxy Note 5 official website you will get the know that Galaxy Note 5 best supported video format is H.264 MP4 format, for other formats you will get DVD playback issue. In this case, you need a third-party software to rip DVD to Galaxy Note 5 supported video format. It nothing difficult to do this job as long as you utilize an easy-to-use and trustful DVD to Galaxy Note 5 converter. But how to choose a good DVD to Galaxy Note 5 converter may be somewhat head-scratching. Fortunately, Pavtube Galaxy Note 5 DVD Ripper brings a perfect solution to this problem, helping to transfer DVD to Galaxy Note 5 at fast ripping speed. Read the review. It can professionally rip DVD to Galaxy Note 5 supported video format with fast speed and excellent output quality. In addition, this DVD ripping tool can also convert DVD to various popular video formats like AVI, MP4, WMV, MPEG, MOV, FLV, MKV, 3GP, etc. as well as rip DVD to optimized video for playback on iPad, iPod, iPhone, Zune, Creative Zen, Archos, iRiver, Blackberry, Xbox 360 and more. Free download the DVD to Galaxy Note 5 Converter: 
 Other Download: – Pavtube old official address: http://www.pavtube.cn/dvd_ripper/ – Cnet Download: http://download.cnet.com/Pavtube-DVDAid/3000-7970_4-76158510.html How to rip DVD to MP4 videos view on Galaxy Note 5 Step 1. Import DVD movies Insert the DVD disc into your DVD drive and launch the Galaxy Note 5 DVD ripper. Click “Load DVD” to select and import the DVD movies you want to rip. ISO and IFO files are also supported.
  Step 2. Specify output format Click the drop-down list besides Format, you can find many presets for different devices, editing programs and media player. Let’s choose “Samsung” in left area and select “Samsung Galaxy Note(*.mp4)” as target video format for Galaxy Note 5.
  Step 3. Start to convert DVD to Galaxy Note 5 Now go to the last step: click “Convert” to begin ripping DVD to Gear VR Innovator Edition compatible MP4 video files. After the conversion, you can tap “Open” to locate the converted videos immediately. Then connect your Galaxy Note 5 to computer and transfer the video files to your Galaxy Note 5 for enjoyment on the go. Tip: If you also want to covert DVD, 2D/3D movies for Galaxy Note 5, Pavtube Video Converter Ultimate will be a nice assistant. More: Play DVD to Galaxy Note 4 via Gear VR for spending holiday Sync iTunes, Amazon and Digital Copy movies to Galaxy Tab 3 Kids Edition Get 3D Blu-ray to watch on Galaxy Note 4 in Gear VR Convert iTunes DRM to SBS 3D to Galaxy Note 4 in Gear VR Best 3 DVD to Samsung Galaxy Note 4 Rippers Review
Src:
Put DVD to Galaxy Note 5 With Unmatchable Quality
Want To Convert Blu-ray to Audio files for Storing in iPod Touch 6 when travelling?
There’s always great audio content in whatever Blu-ray disc collections you have in your library. Those of you probably want to get a Blu-ray to Audio converter tool to rip just the audio of Blu-ray into AIFF/WAV/AAC/MP3 for iPod Touch 6. Learn>> Blu-ray Audio Explained.  Hot Search: Audio Compressor | FLAC to iPhone 6 | FLAC on Galaxy S4/S5/S6/S6 Edge | Rip Audio from YouTube | From Apple official website, we can learn iPod Touch 6 supports all most all audio files including AAC (8 to 320 Kbps), Protected AAC (from iTunes Store), HE-AAC, MP3 (8 to 320 Kbps), MP3 VBR, Audible (formats 2, 3, 4, Audible Enhanced Audio, AAX, and AAX+), Apple Lossless, AIFF, and WAV. Blu-ray discs are not supported, and that’s why iPod Touch 6 won’t open it. So, you need to convert Blu-ray Audio discs to AIFF/WAV/AAC/MP3 for widely use and play well on our Media player and other main stream device such as Apple device. If you happened to such questions, please don’t worry any more. Pavtube ByteCopy for Mac is the professional and easy to use Blu-ray to AIFF/WAV/AAC/MP3 Converting software, In addition, you can Convert Blu-ray/DVD music to lossless AIFF/WAV/AAC/MP3 audio format. Still delivering an ultra-high quality listening experience on Mac. Even encoding Blu-ray to H.265 MP4 is supported. Read review. Besides, Pavtube ByteCopy for Mac can convert latest Blu-ray and DVD movies to any other formats like MP4, MOV , M4V, AVI, WMV, MPG, MKV, etc or MP4/MOV with multi-track audios for playback and it is also able to encode Blu-ray movies and DVDs to MKV container format with preserving chapter markers, multiple audio tracks and subtitles. Use Pavtube ByteCopy for Mac to convert Blu-ray Discs to AIFF/WAV/AAC/MP3 for enjoying on iPod Touch 6 Note: This guide below uses Mac OS X screenshots to show you how to finish the conversion easily. The way to extract Blu-ray/DVD discs to AIFF/WAV/AAC/MP3 audio files on iPod Touch 6 via Windows 10 is the same, just get the Windows app Pavtube ByteCopy. Read Mac OS X 10.10 Yosemite VS Windows 10.
 Other Download: - Pavtube old official address: http://www.pavtube.cn/bytecopy-mac/ - Cnet Download: http://download.cnet.com/Pavtube-ByteCopy/3000-7970_4-76177783.html Step 1: Install and launch the Mac Blu-ray/DVD Audio Ripper for iPod Touch 6; import your Blu-ray Disc or Backup saved on hard drive by clicking “Load File” icon. You can also convert a pure audio Blu-ray/DVD to AIFF/WAV/AAC/MP3 audio files for iPhone/iPad/Apple Watch on Mac.
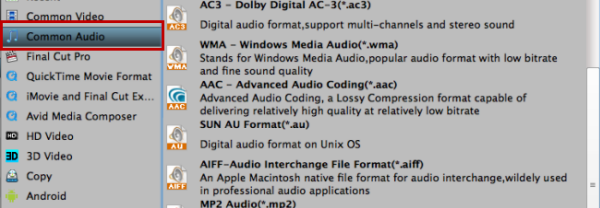
 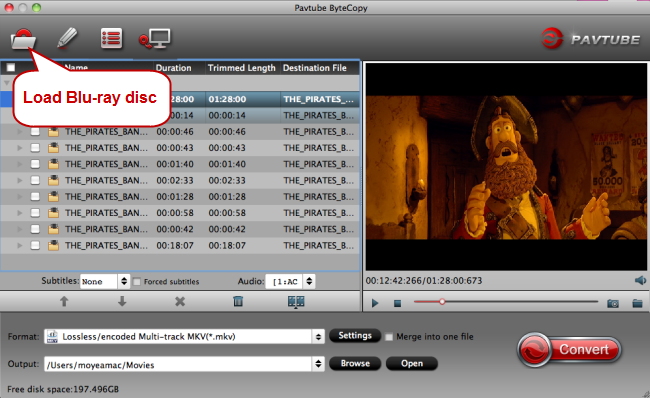 Step 2. Choose Lossless AIFF audio format. Here click the format bar to follow choose “WAV – Waveform Audio(*.wav)” or “AIFF-Audio Interchange File Format(*.aiff)” from “Common Audio” and other files as you want for playback.
  Step 3. Convert pure audio Blu-ray/DVD to AIFF/WAV/AAC/MP3 Click the red button on bottom-right corner to realize conversion from high fidelity pure audio Blu-ray/DVD to AIFF/WAV/AAC/MP3 for iPod Touch 6. After completing conversion from high fidelity pure audio Blu-ray/DVD to AIFF/WAV/AAC/MP3, you can streaming the converted pure audio Blu-ray/DVD to iPad or iPhone and iPod Touch 6 in FLAC/WAV/AAC/MP3 with Hi-res audio quality. More: Rip Blu-ray to H.264 MP4 using Handbrake? Get Alternative? Backup Furious 7 Blu-ray on Apple TV 3, 2, 1 Rip Gone Girl Blu-ray for streaming to Apple TV over Plex Put 2D/3D Blu-ray to iTunes library for Apple TV viewing Rip Blu-ray to Plex in MKV with DTS 5.1 Sound View Blu-ray Movies on XBMC player via network Src: Rip Blu-ray to Audio files for Storing in iPod Touch 6 When Travelling
If you want to get a Best DVD Ripper in 2015, this guide will be helpful. We give you top 5 Best DVD Ripper Program Reviews for you here. You can according the reviews to choose a proper DVD Ripper for you. I will take 6 points into review.
- Cost/Performance: Everybody wants to gain more with less money.
- Video Quality: Someone often uses the device to watch movie/video/tv shows, so the output video quality should be considered seriously. Top DVD Ripper output without any loss in the video and image quality of the exports. To enjoying the high definition video is of great pleasure. Or else, not only your eyes may get hurt; the annoying jumpy and mosaics will also bother you.
- Speed: Convert DVD often takes time, an hour DVD movie takes around thirty minutes to convert to MPEG-4 movie, if you have multiple DVDs to be converted, a high speed converter would be your best bet, or else, you will waste much time on the conversion, and your computer will be tied to the process.
- Quality of DVD: Sometimes, rip DVD to device according to the original DVD quality, or the types of the DVD to determine the ripped file quality.
- Easy to use: There are still many users knew little about computer, so complicated parameter settings will strain their brain, as a result, a application with simple interface and steps is the acceptable.
- Personal Demands: For example, someone just wants to convert part of the DVD video, or others want the special output video format like Apple TV compliant forms and etc.
Concerning the above factors, I've selected 5 Best DVD Ripper for reference. Just hold on reading.
- First: Pavtube DVDAid
- Second: Magic DVD Ripper
- Third: DVDfab DVD Ripper
- Fourth: WinX DVD Ripper
- Fifth: Aiseesoft DVD Ripper
NO. 1. Pavtube DVDAid–Excellent Price: $35 (Windows or Mac) 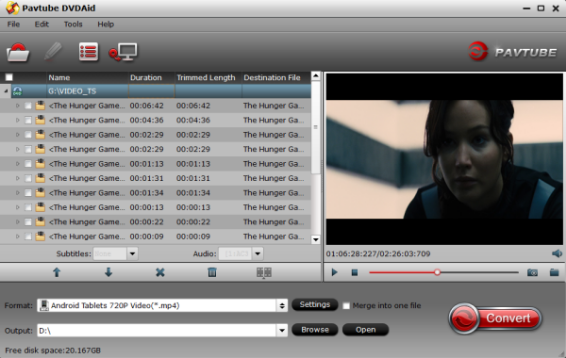 Pavtube DVDAid is regarded as the best DVD ripping software on the market that provides movie lovers, children and people in any group with the easiest and fastest way to rip and convert DVD movies to MP4/AVI/MKV/WMV and many other video and audio formats with high quality. It lets you enjoy DVD movies on any portable device like iPhone 6/6 Plus, iPad Air,iPad Air 2, Nexus 7, Asus Fonepad 7,Sony Xperia Z2, Surface 2, Surface Pro 2, Surface Pro 3 and Surface RT/Pro, Kindle Fire HDX, etc. Moreover, Pavtube DVDAid makes 1:1 copy of original DVD Disc without quality loss with all audio streams, subtitle tracks, extras, etc and also help you direct copy titles from main DVDs. For the short time it takes to convert the movie with the help of CUDA/AMD GPU acceleration, and you will get hours of enjoyments. It's simple to use and well worth the investment. Highlight:
- Support latest DVD
- Features with adding *.srt and *.ass subtitle
- Create 3D videos from Blu-ray/DVD
- Support encoding DVD to H.265
Below is two users' reviews:
- Your profile works just great and the picture is clear, well as always you guys are fantastic with your products and please work on being able to burn to DVD once the user has made their conversation that is something that your competitors can not do directly and that would be awesome and I would love to be your beta tester.
- It is easy to use for editing and conversion and makes great quality copies of my DVDs. I really like that I can turn up the volume on my DVDs. It is a great feature! I also like that it gives me a lot of options when choosing how to copy and convert my DVDs. I tried some other DVD software and researched others and this seems to be the best! I am glad that I bought this software!
Tips: 1. Pavtube also released an advanced version- Pavtube BDMagic ($39.2), which deals with both DVD and Blu-ray Disc.
2. Want to rip your Blu-ray/DVD movies to 3D videos for playback? Want to convert or backup your Blu-ray movies and DVDs with keeping original multiple audio tracks and subtitle , trying Pavtube Bytecopy (Windows / Mac), which is the best Blu-ray/DVD Copying & Ripping software for you. 3. Want to freely convert your DVD videos on Windows or Mac? Like Pavtube at their Facebook Page and get its Free DVDAid for Win/Mac to help you convert any DVDs to MOV, MKV, AVI, MPG, VOB, WMV, FLV, etc. with fast speed. It also helps edit DVD and add SRT/ASS/SSA subtitles to DVD movies. If you travel a lot and you are looking for a way to take DVD movies you purchased with you to enjoy all the movies in your library, or you just want to backup your DVD collection to avoid them from daily playback damage or from your children, Pavtube DVDAid is the best choice. Trial Download:
NO. 2. Magic DVD Ripper – Good Price: $35 (Windows or Mac)  Magic DVD Ripper detects and imports DVD from optical drive automatically. If you have a DVD backup on hard drive, you can select and load the VIDEO_TS folder instead. Magic features adequate common video formats (MP4, AVI, WMV) for average users, but 32 presets are not sufficient for Android users, since there’s only 1 format for Android tablet – the Kindle Fire. As Galaxy Tab owner I would like to put DVD movies onto the 10.1' tablet and I need a costumed format to ensure smooth playback on my device. Magic DVD Ripper failed to keep the original aspect ratio, and gave softer image. Magic DVD Ripper serves as a nice tool for copying and burning DVDs though. No. 3 DVDfab DVD Ripper – Good Price: $49 for one-year license (Windows or Mac)
  DVDfab has a comfortable blue interface, but it is not user-intuitive as Pavtube when it comes to operation. DVDfab DVD Ripper is good for those who would like to have external subtitles and 2 audio languages (MKV only), or those who want to rip a DVD to iPad MP4 and MKV at one time- this app queues up your conversion tasks and it pops up settings/queue box each time a chapter is selected (this makes the operation kind of misleading). There’re some presets for Android smartphones and tablets, and you’re allowed to custom your own format to utilize the screen of your tab. Overall, DVDfab is a nice choice for ripping DVD to MP4/MKV with multi-streams. No. 4 WinX DVD Ripper – Fair Price: $0 (freeware)
  WinX DVD Ripper seems smarter; you can whether load a DVD or a VIDEO_TS folder at the very start. However, the software failed to find the correct main movie when I did test with Chipmunks: Chipwrecked (2011) DVD, all it finds are extra movie trailers (e.g. Ice Age 4 as it shows in below sceenshot). Anyway, you should not expect much to a free tool. WinX support quite a lot of formats(MP4, MPG, WMV, FLV, MOV), and luckily I managed to find Samsung Galaxy Tab format which works for my device. Are there any other formats for more Android tablets? Unfortunately the answer is NO. WinX DVD Ripper failed to recognize the main movie during above test, but it’s still a good choice for those who hang on to freeware. No. 5 Aiseesoft DVD Ripper – Poor Price: $35 (Windows or Mac)
  The Aiseesoft DVD Ripper is a satisfactory application to use when you need to copy movie DVDs to computer, rip DVDs to videos or audios of any format so that you can enjoy them on your portable device like PSP, iPod, iPhone, iPad(iPad2), Zune, Blackberry, Creative Zen, Apple TV, Xbox, etc. The software does a good job working out the presets for popular Android smartphones (e.g. Samsung Galaxy S2, Samsung Galaxy S3, Samsung GALAXY Note 2), yet not so good in terms of Android tablets- still lacking of presets to specific Android tabs. This DVD converter comes with creative editing tools, so you can customize output movies by trimming, cropping, watermarking, etc. In Conclusion: Pavtube DVDAid is proved to be the Best DVD Ripping program. It ranks top on the DVD ripping application list for almost every aspect except for interface design. Anyhow, hope this top 5 best DVD Ripper Review can help you fast choose an easy-to-use and yet professional DVD ripping tool. Now get the best DVD Ripper Program for You! More: Top WTV Converter - Convert WTV to MP4, AVI, MKV etc Top 10 Free Apps to Stream Android Videos to Apple TV Top 2 Best Lossless Blu-ray to MKV Converter Review: ByteCopy & MakeMKV Top 5 Best Blu-ray Ripper for Mac Programs Review Best Video Converter Ultimate Reviews: Pavtube and Wondershare Src: 2015 Top 5 Best DVD Ripper Program Review
NAS is just a big file storage really and you may find that just copying the DVD files to Synology NAS directly is a pain to try and play with a media streamer(PS3, WD TV, etc). Then which is the best way to take the DVDs and put the DVD movies on NAS drive for playing on most media streamers… Hot Search: iTunes Videos to NAS | DVD to QNAP TS-469L NAS | iTunes Library to a NAS | Disc to NAS 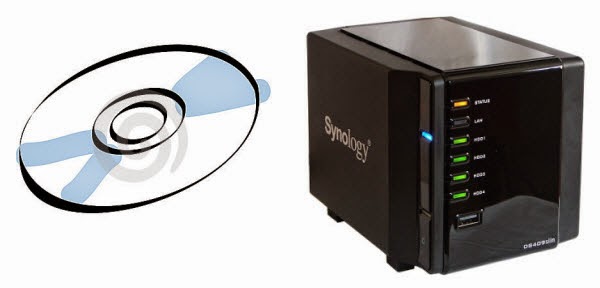 First, a quick note: we know that there is still a lot of legal ambiguity around ripping content that you have legally purchased. At Audioholics, we believe that you should be able to watch purchased media on your system regardless of whether it's coming from a standalone DVD player or a media center frontend. Actually, it's not as difficult as you imagine. To get DVDs on Synology NAS, you'll need a third-party DVD ripping software. Most of you are likely familiar with the excellent Handbrake for ripping standard Def DVDs, but it still cannot yet protected DVD discs. The way it can with regular DVDs, so you'll need to add an intermediate step. Pavtube DVDAid is the bee's knees, which can help you fast rip DVD discs to a format playble by NAS while keeping the original quality. (Read the review) With it, ripping DVD for Synology NAS is simple as ABC. After downloding, follow the wizard to install and run the program. The mac version is DVDAid for Mac. Then follow the steps below to convert DVD to Synology NAS comaptible formats in a few clicks!
How to rip and stream DVD movies via Synology NAS Step 1: Insert your DVD disc into DVD ROM, Launch the program and click the "Disc" button to import the DVD movies. DVD folder and ISO/IFO files are also supported. You can select subtitles as you want.
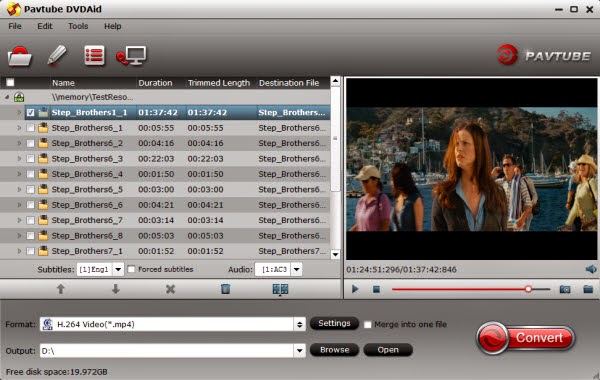 Step 2: Click Format and choose MP4 video from Common Video, which can be recognized by Synology NAS well. MKV is also a good choice; as a container format it takes whatever you give it. And then click the Browse button to specify an output folder to save the converted files.
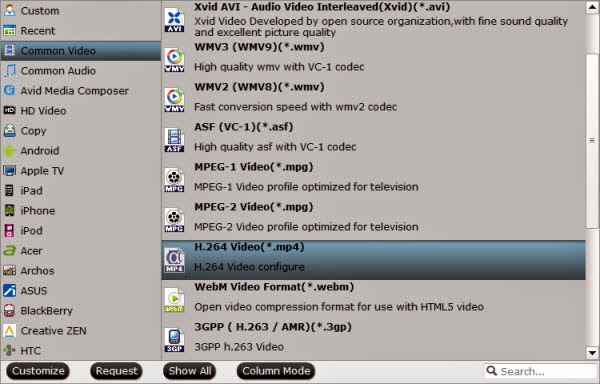
Tip: With the right settings you can retain the quality of the original DVD while also saving space. This is particularly helpful when streaming over your network, depending on your network quality. Simply click Settings bar and you can tweak the settings to your satisfaction and even save it as preset. 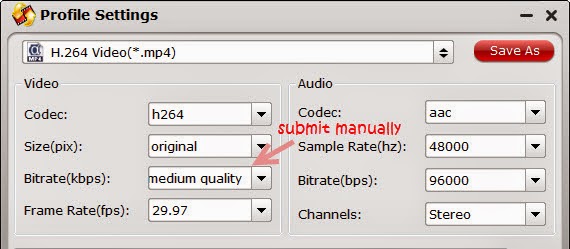 Step 3: Finally, hit the "Convert" button at the bottom of the main interface to start the conversion. It will automatically convert DVD to Synology NAS compatible video files. Once the conversion is finished, click "Open" to quickly find the converted movies. Then, Synology NAS will recognize, catalog, play and stream these DVD rips at ease. More: Can Roku 3 read ISO files from USB or NAS Stream Blu-ray movies from NAS device to Xbox 360 (Slim) Backup Blu-ray on WDTV 2 via NAS or synology 415play Rip Blu-rays to NAS device for streaming at anytime Backup 2015 Hot Blu-ray releases to NAS for TV Streaming Src: How to Get all DVDs into Synology NAS drive for Streaming
DVD to Plex Question: Has anyone ripped their DVD collection to a hard drive for streaming via Plex? have a 25 terabyte Drobo DAS Device and I like store DVD movies on the DROBO and Plex picked up the info and creates my own personal Netflix, I need a top DVD Ripper for Plex to digitize my DVD library and import the digital file .mkv mostly, into PLEX. Then, I’m planning to majority of time watch from home. Use XBOX with Plex App, Smart TV with Plex App, and will be buying a blue-ray or roku with Plex app. Any help/input would be greatly appreciated?”
Hot Search: Disney Christmas DVDs | DVD on Nabi 2S | Pavtube DVDAid vs AnyDVD | DVD to QuickTime
Best DVD Ripper for Plex Media Server:
There’s all kinds of different software out there (some free, some not) with a variety of different options. It seems a bit overwhelming. Is there a good piece of software that you can pick up is that: Pavtube DVDAid. With it, you can easily convert the commercial DVD movies to Plex compatible video formats or almost all regular video formats like MP4, MOV, MKV, FLV, WMV, AVI, etc. and even extract MP3, WMA, FLAC, OGG, etc. audio with high quality and fast speed. Read the Top DVD Ripper review.
Besides, it aims to solve the program by giving us the ability to store our purchased physical DVD discs to local computer, hard drive then stream over a home network for Plex Media Server and iPad Air, iPhone 6 plus, Smart TV, Apple TV, Roku 3, Xbox One, PS3, Portable devices playback. It’s professional in ripping and converting DVD discs, DVD ISO image, DVD copies and more. For Mac users, turn to Pavtube DVDAid for Mac.
How to rip DVD to Plex media server for streaming and sharing?
Step 1: Load DVD discs.
Insert your DVD disc to the drive, then launch the DVD ripping software and click the “Load Disc” button to have the DVD content imported. You can also add VIDEO_TS folder, DVD ISO files are the source files for converting.
Tips: You can click on the dropdown list of “Subtitles” to select your needed subtitles so that you can view DVD movies with proper subtitles.
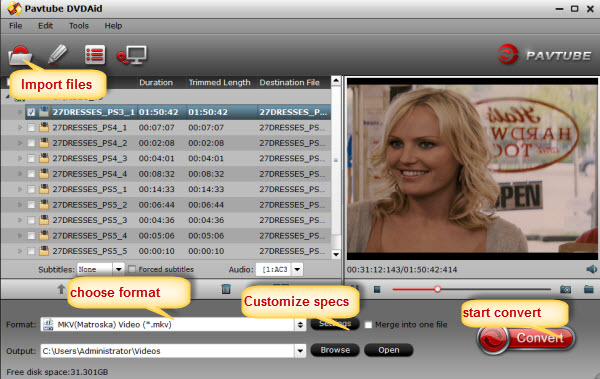 Step 2: Decide output format
Click Format bar and choose MP4 from Common Video, which can be recognized by Plex well. MKV is also a good choice; as a container format it takes whatever you give it. Read the Plex Supported Format and Installation.
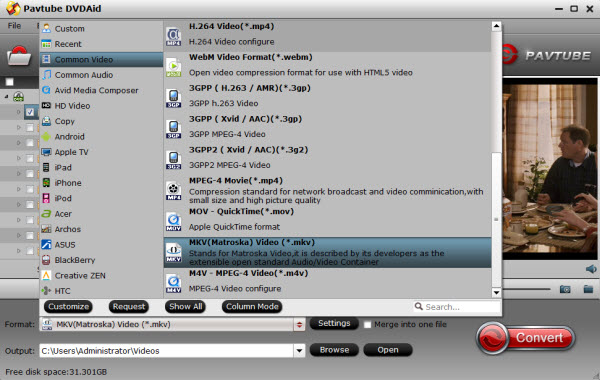 Note: With the right settings you can retain the quality of the original DVD while also saving space. This is particularly helpful when streaming over your network, depending on you r network quality. Simply click “Settings” bar and you can tweak the settings to your satisfaction and even save it as preset.
Step 3: Convert DVD to Plex Media Server
Click the “
Note: With the right settings you can retain the quality of the original DVD while also saving space. This is particularly helpful when streaming over your network, depending on you r network quality. Simply click “Settings” bar and you can tweak the settings to your satisfaction and even save it as preset.
Step 3: Convert DVD to Plex Media Server
Click the “Convert
” button under the preview window, and the DVD ripper will start the conversion from DVD movies to Plex Media Server. Once the conversion finished, get the ripped DVD files onto Plex Media Server easily. Now you can stream DVD movies through Plex to any portable devices for great enjoyment.
More:
How to convert DVD to Windows Media Player
How to Rip DVD to PS4 for smooth viewing on Mac
Comprehensive Methods to Rip DVD to VLC
Add DVD to iTunes for playback on Apple device
Viewing DVD movies on Surface 3, Surface Pro 3 in best quality
Get DVD to Media Player Classic
Convert DVD to M3U8 for Vitamio Streaming in Android
Src:
Get all DVDs into Plex Media Server


