Premiere Pro CC is the favorite software for video editing for many people. They can import many kinds of source material to Premiere Pro CC for editing. But if the source material is exist in DVD disc, no matter the family video you recorded or the commercial one you bought, none of them can be put into Premiere Pro CC for your editing because most video editing tool doesn’t support DVD importing including Premiere Pro CC. Here, let us discuss the details how to import footage on DVD into Premiere Pro CC so that you can succeed in editing it.
Solution 1: Insert DVD into your computer player and then open it in Explore. Copy the DVD Video-TS folder onto your computer. Open this folder and rename the file from VOB extension to MPG extension. Now, Premiere Pro CC should accept the video.
Note: This way is based on non-protected DVD video. It does not work in your commercial DVD disc. And from the feedback of our research online, many people respond that renaming the filed don’t work; the files can be import to Premiere Pro CC but are unusable.
Solution 2: For perfectly importing DVD to Premiere Pro CC to edit, the better way is to extract the video clip out of DVD disc and change the video to a format that can be supported by Premiere Pro CC with DVD to Premiere Pro CC software.
Pavtube BDMagic for Mac will be a good choice for the goal. It can rip and backup DVD to MPEG-2, WMV, MPG, MOV format on Mac, which can be easily recognized by Premiere Pro CC, with the original video quality. You can choose to rip one title or entire DVD disc to MPEG-2 format video favored by Premiere Pro CC on Mac OS X El Capitan 10.11, Yosemite 10.10 and Maverick 10.9. It enables you to trim DVD video footage, merge several video clips, crop video black area before outputting.
For Windows users, the equivalence product is BDMagic for Windows. If you want to learn more functions about BDMagic, you can read the review.
Now, you can download and install BDMagic for Mac freely and follow the next steps to rip DVD to Premiere Pro CC.
Free download and install:


Other Download:
– Pavtube old official address: http://www.pavtube.cn/blu-ray-ripper-mac/
– Cnet Download: http://download.cnet.com/Pavtube-BDMagic/3000-7970_4-76177782.html
How to import DVD to Premiere Pro CC on Mac?
Step 1. Load DVD movieRun the DVD to Premiere ripper for Mac, and click “File” to import DVD movie to the app.
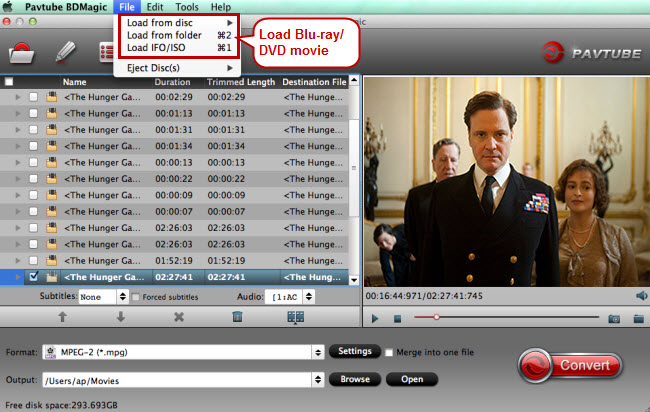
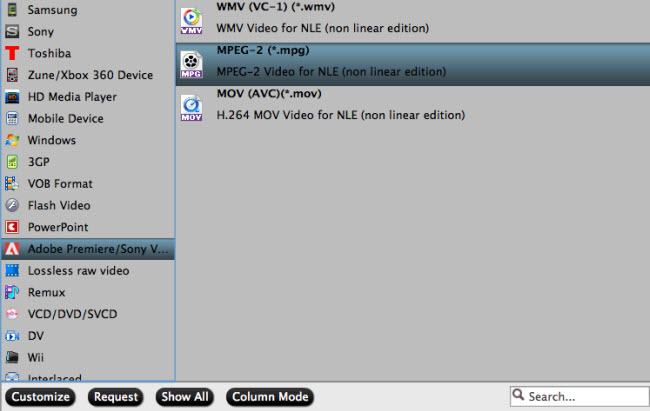
Step 2. Choose Premiere compatible format
Ripping DVD clips to MPG, WMV or MOV – highly compatible with Adobe Premiere will be great. Here you can click the format bar to follow “Adobe Premiere/Sony V…” > “MPEG-2(*.mpg).” for Premiere Pro CC.
Step 3. Cut clips from DVD movie (Optional)
To get the clips from DVD video, open the “Video Editor” by clicking “Edit” and cut the wanted DVD movie clips by tapping on “trim.” Other helpful editing functions are cut off black bars by cropping, adding watermarks, adjusting special effects.

Step 4. Rip DVD to Premiere Pro CC
When back to the main interface, click “Convert” in bottom right screen to realize DVD to Premiere Pro CC conversion for free importing and ingesting by Adobe Premiere Pro CC.
Finally, you can import the ripped DVD media file to Premiere Pro CC on Mac for your editing.
More
How to Play Blu-ray via Apple TV on Large Screen
Top 5 Finest DVD Ripper Program Review
Upload DVD to Dropbox
Transfer iTunes Movies to Dropbox for playing at Anywhere
Upload Canon XC10 XF-AVC 4K MXF to YouTube/Vimeo/Facebook
Convert HD Videos to H.265 MKV for Playing on Windows
Can’t Play MKV, AVI, MP4, FLV, WMV, MPG, MOV by Chromecast
Rip DVD to MPEG-2 for Importing to Premiere Pro CC
Src
Rip DVD to MPEG-2 for Importing to Premiere Pro CC
Solution 1: Insert DVD into your computer player and then open it in Explore. Copy the DVD Video-TS folder onto your computer. Open this folder and rename the file from VOB extension to MPG extension. Now, Premiere Pro CC should accept the video.
Note: This way is based on non-protected DVD video. It does not work in your commercial DVD disc. And from the feedback of our research online, many people respond that renaming the filed don’t work; the files can be import to Premiere Pro CC but are unusable.
Solution 2: For perfectly importing DVD to Premiere Pro CC to edit, the better way is to extract the video clip out of DVD disc and change the video to a format that can be supported by Premiere Pro CC with DVD to Premiere Pro CC software.
Pavtube BDMagic for Mac will be a good choice for the goal. It can rip and backup DVD to MPEG-2, WMV, MPG, MOV format on Mac, which can be easily recognized by Premiere Pro CC, with the original video quality. You can choose to rip one title or entire DVD disc to MPEG-2 format video favored by Premiere Pro CC on Mac OS X El Capitan 10.11, Yosemite 10.10 and Maverick 10.9. It enables you to trim DVD video footage, merge several video clips, crop video black area before outputting.
For Windows users, the equivalence product is BDMagic for Windows. If you want to learn more functions about BDMagic, you can read the review.
Now, you can download and install BDMagic for Mac freely and follow the next steps to rip DVD to Premiere Pro CC.
Free download and install:
Other Download:
– Pavtube old official address: http://www.pavtube.cn/blu-ray-ripper-mac/
– Cnet Download: http://download.cnet.com/Pavtube-BDMagic/3000-7970_4-76177782.html
How to import DVD to Premiere Pro CC on Mac?
Step 1. Load DVD movieRun the DVD to Premiere ripper for Mac, and click “File” to import DVD movie to the app.
Step 2. Choose Premiere compatible format
Ripping DVD clips to MPG, WMV or MOV – highly compatible with Adobe Premiere will be great. Here you can click the format bar to follow “Adobe Premiere/Sony V…” > “MPEG-2(*.mpg).” for Premiere Pro CC.
Step 3. Cut clips from DVD movie (Optional)
To get the clips from DVD video, open the “Video Editor” by clicking “Edit” and cut the wanted DVD movie clips by tapping on “trim.” Other helpful editing functions are cut off black bars by cropping, adding watermarks, adjusting special effects.
Step 4. Rip DVD to Premiere Pro CC
When back to the main interface, click “Convert” in bottom right screen to realize DVD to Premiere Pro CC conversion for free importing and ingesting by Adobe Premiere Pro CC.
Finally, you can import the ripped DVD media file to Premiere Pro CC on Mac for your editing.
More
How to Play Blu-ray via Apple TV on Large Screen
Top 5 Finest DVD Ripper Program Review
Upload DVD to Dropbox
Transfer iTunes Movies to Dropbox for playing at Anywhere
Upload Canon XC10 XF-AVC 4K MXF to YouTube/Vimeo/Facebook
Convert HD Videos to H.265 MKV for Playing on Windows
Can’t Play MKV, AVI, MP4, FLV, WMV, MPG, MOV by Chromecast
Rip DVD to MPEG-2 for Importing to Premiere Pro CC
Src
Rip DVD to MPEG-2 for Importing to Premiere Pro CC
No comments:
Post a Comment