Can DVD Players Play WMV?

Using WMV format for digital data is convenient. That is probably the reason why large amounts of content on the Internet, especially videos and images are in the WMV format. However, can DVD players play WMV? The answer is no. In such a situation you can find a WMV DVD player or download the software for converting WMV to DVD formats and watch converted WMV videos on DVD player. You can download the specific link or the application that can help to convert WMV files into the DVD formats. 

How to Get WMV to Play on DVD Player? 

You can't just copy a .wmv file to a DVD and expect your DVD player to play it. In order to solve can't play WMV on DVD player, you first need to know which video format does your DVD player can play and then convert your WMV to DVD player supported format like Divx AVI, MPEG-2 etc so as to successfully burn WMV to DVD disc for easy playback on DVD player. One of the best applications that you can use for converting the WMV videos is Pavtube Video Converter Ultimate (Mac

Free download and install


Other Download: 

- Pavtube old official address: http://www.pavtube.cn/blu-ray-video-converter-ultimate/ 
- Cnet Download: http://download.cnet.com/Pavtube-Video-Converter-Ultimate/3000-2194_4-75938564.html 

With it, you can convert, and create the WMV videos in the DVD format for playing on DVD players. Besides, it also has the ability to convert WMV, AVIMKV, Tivo, H.265, MOV etc to DVD player formats for smooth playing. What’s more, it can also help you to edit photos, attach suitable background music to the projects, and more. 

Below is the step by step guide on how to convert WMV files to DVD player supported video format on Windows or Mac computer. 

Convert WMV to DVD player supported formats for playing nicely 

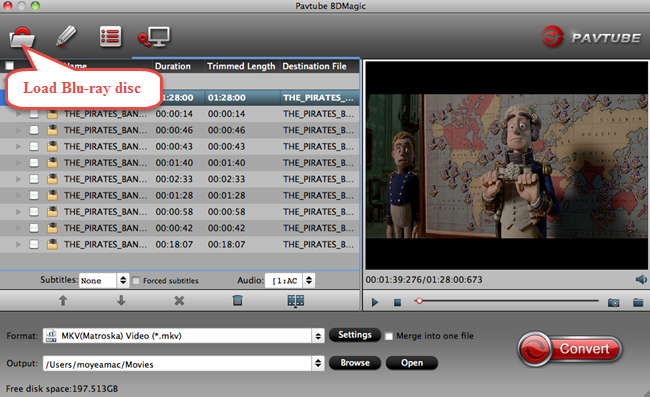
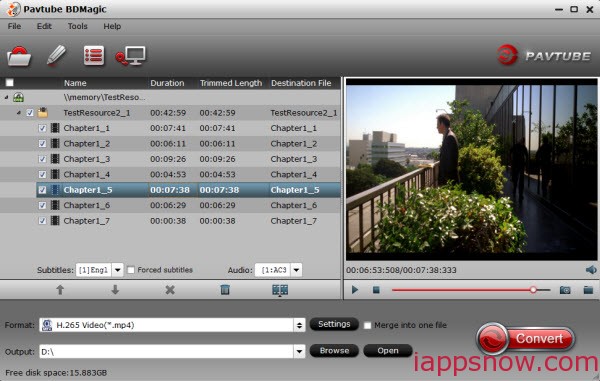
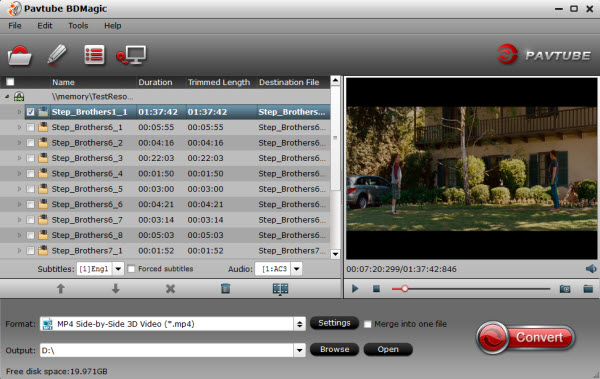
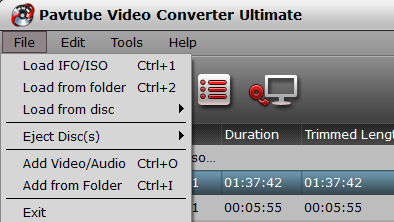
Step 1. After downloading, follow the wizard to install and launch the WMV to DVD Player Converter. Then load the WMV files you want to convert. 


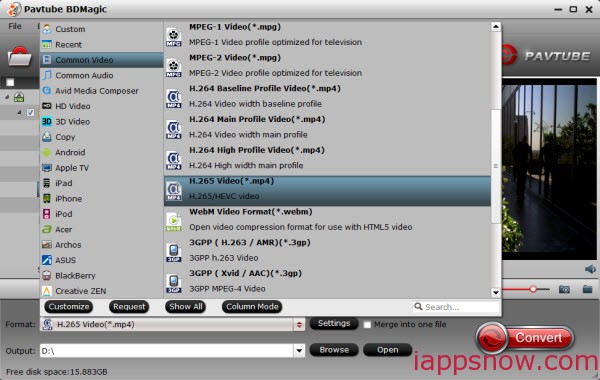
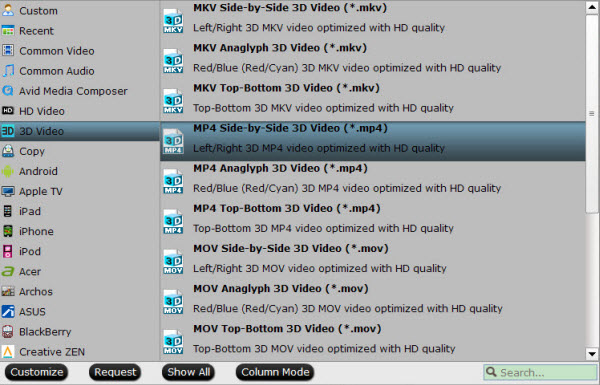
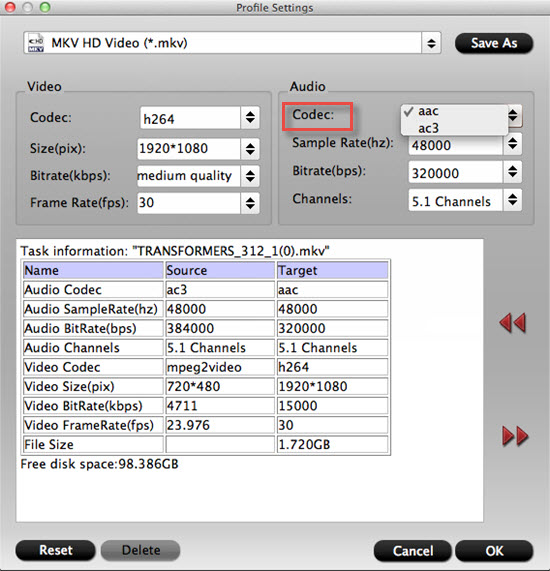
Step 2. Next, choose a video format that is supported by DVD Player as the output format. Simply click "Format" > "Common Video" or "HD Video" and select MPEG-2 or Divx from the format list. Most DVD players only accept MPEG-2 in standard VOBs. Some of the newer DVD players support AVI encoded with DivX. Look into the player manual, it'll tell you what formats are supported. 


Step 3. When all the settings are OK, go back to the main window and click the "Start conversion" button at the bottom right corner to begin transforming WMV to Divx/MPEG-2 for DVD Player. When the conversion is done, click "Open" to locate the converted video files. After that, you can play them in DVD Player or burn them into DVD discs as you like. 

More Topics: 

3D MKV movies to Rift CV1 on macOS Sierra/El Capitan

What is the first media player on Mac OS X El Capitan? Quicktime will be the one. Not because it is bundled with Mac OS X, just in that it's powerful media technology that works on Mac OS X El Capitan with just about every popular video or audio format you come across. Its playable audio and video formats just like the same sheet:


Although QuickTime supports many video formats, as we all seen, Blu-ray is not in the list. So if you have many Blu-ray movies, no matter from your paid Blu-ray discs or downloaded from internet, how do you watch Blu-ray movies on QuickTime Mac OS X El Capitan?

Pavtube BDMagic for Mac is exactly designed for this problem. This Blu-ray to QuickTime converter enables you to rip and backup Blu-ray to QuickTime playable formats at ultra fast time with high video quality. What’s more, it is updated to support the Mac OS X El Capitan and Yosemite 10.10. So you can rip Blu-ray on your Mac OS X El Capitanand Mac Yosemite 10.10/10.9. It also can play Blu-ray movies of region A, region B and region C.


Free download and install:


Other Download:
- Pavtube old official address: http://www.pavtube.cn/blu-ray-ripper-mac/
- Cnet Download: http://download.cnet.com/Pavtube-BDMagic/3000-7970_4-76177782.html

How to rip Blu-ray to QuickTime playable format?

Step 1: Load Blu-ray movies

Click the "Folder" icon on the top menu bar to load your Blu-ray disc to the program


Step 2: Choose QuickTime MOV format

Click "Format" bar, from its drop-down selection, define "MOV-QuickTime (*.mov)" as the output profile format.


Step 3: Start to rip Blu-ray to QuickTime

Start to rip Blu-ray to QuickTime format process on OS X El Capitan by hitting the right-bottom conversion button. When the conversion is done, locate the ripped Blu-ray in the output folder.

Now, you can freely enjoy your Blu-ray movies on QuickTime on Mac OS X El Capitan.
In addition, this Blu-ray Ripper actually can convert Blu-ray, ISO to H.265, M3U8, MP4, etc, for iPhoneiPad, Apple TV directly. Besides, it also has powerful function to extract FLAC audio

Source: http://2d-3d-movie-tips.blogspot.com/2015/07/watch-blu-ray-on-quicktime.html

Ripping Blu-ray to H.265/HEVC MP4 on PC

HEVC/H.265, the successor to AVC/H.264, more than triples the existing AVC intra-frame prediction modes to achieve significant bitrate savings, It is targeted to next-generation HDTV displays and content capture systems that feature progressive scanned frames and display resolutions from QVGA (320×240) up to 1080p and Ultra HDTV 4320p (7680×4320.) It is a codec that can offer up to 50% reduced bitrate at the same quality when compared to AVC/H.264. 


In this article, I will show how you can convert your Blu-ray to H.265/HEVC MP4 on PC to greatly reduce the output size in a simple and fast way. 

Then how can we do to compress the size of Blu-ray files so that we can bring them with our H.265/HEVC players for watching? Here Pavtube BDMagic is quite intuitive. Even though you have no experience on Blu-ray ripping, you can know the each next step according to the instructions on the main interface. You can rip Blu-ray and DVD to H.265/HEVC MP4 and MKV up to 30x times speed using Nvidia GPU hardware acceleration and convert Blu-ray and DVD to H.264 MP4, MKV, AVI, WMV, FLV, TS, MOV, M4V, etc by up to 500% speed with NVIDIA CUDA acceleration than the same action with no acceleration. 
Main features:
  • Powerful Blu-ray/DVD Ripper: Converts Blu-ray/DVD and ISO/IFO files to H.265 video filess rapidly in high quality.
  • Wide Selection of Formats Supported: Converts any video files to various video and audio formats and popular media players
  • Fast-Speed Blu-ray/DVD Converter: If your computer have Nvidia CUDA/ATI AMD ready graphics card, you can have GPU encoding and the conversion would be faster. Note this function only works when you choose H.264 Baseline Profile.
  • Lossless Conversion: Converts Blu-ray, DVD video files without the risk of losing its original quality.
  • Additional Features: Edit tool videos, can create 3D video, 1:1 disc backup, copy main BD/DVD movie and etc.
Guide: Rip and compress Blu-ray to H.265/HEVC MP4 on PC with best quality 

Step 1: Import Blu-ray movies to the best Blu-ray to H.265 Ripper 

Load your disc to the Blu-ray drive room, and launch the Blu-ray to H.265 Ripper; click the disc button to import your Blu-ray movies to the program. 


Tip: 

Click the main file of your Blu-ray to select the subtitles for Blu-ray movies in the “Subtitles” option. 

Step 2. Choose the suitable output format 

From format bar, just choose “Common Video >> H.265 Video(*.mp4)” as your output format. Or select “HD Video >> H.265 HD Video(*.mp4)” to get HD quality. 

To get H.264 video for output, just go to the ‘Common Video’ to select the ‘H.264 Baseline/Main/High profile (*.mp4)’ as your favorite. Or in the ‘HD Video’ item, ‘H.264 HD Video (*.mp4)’ is also available. 

You can also choose the preset output format for spacial devices such as iPad, Apple TV.etc 


Tip: 

Before conversion, you can go to the “Settings” to set the parameters for your movie. To compress the file size, adjust the parameters to be smaller. 

PS: Some quality will be lost if you compress them to be much smaller. So Pls ensure the movie quality before adjust the parameters. 

Step 3. Rip BD to H.265/HEVC MP4 

Click the Convert button on the main interface to start compressing Blu-ray. Once the conversion finished, you can get the ripped video as you wanted by clicking “Open” button. Sharing your movies with families and friends on TV or H.265 media players is easy for you! 

Wanna do H.265 conversion? You can get this upgraded ultimate converter to decode H.265 video or encode your videos to H.265 MP4 for playback. 

Rip 3D Blu-ray movie to SBS 3D MP4 video for playback on your 3D devices

The best 3D Blu-ray Ripper here assists you to rip and convert your Blu-ray to side-by-side 3D MP4 video and you can enjoy the 3D video with 3D player.“I cannot find any instructions on how to rip a 3D Blu-ray disc to side-by-side form. I’d like to make Blu-ray 3D to MP4 SBS backups. Is there a tutorial somewhere on your website?” 
 
Maybe most 3D movie fans would ask the same question to either backup their 3D movies free from physical disks or prepare for future usage such as watching copied 3D movies on 3D player. 

To rip Blu-ray to side-by-side 3D MP4 video, Pavtube 3D Blu-ray Ripper- BDMagic is the best 3D/2D Blu-ray to Side-by-Side 3D ripper to assist you with ripping Blu-ray to side-by-side 3D MP4. Mac users could use 3D Blu-ray Ripper for Mac which is specially designed for Mac users to create 3D SBS MP4 video out of 3D/2D Blu-ray movies. 

Free download and install: 


Other Download: 
- Pavtube old official address:http://www.pavtube.cn/blu-ray-ripper/ 
- Cnet Download: http://download.cnet.com/Pavtube-BDMagic/3000-7970_4-75922877.html 
- Soft32 Download: http://pavtube-bdmagic-for-mac.soft32.com/ 
- Top4download: http://www.top4download.com/pavtube-bdmagic/ajqchjrf.html 
- Softpedia Download:http://www.softpedia.com/get/CD-DVD-Tools/CD-DVD-Rip-Other-Tools/Pavtube-BDMagic.shtml 
- OKD Download: http://owlkingdownload.com/index.php?a=prog&os=Mac&cat=Audio-Video&subcat=Video&det=362 
- Instaluj Download: http://www.instaluj.cz/pavtube-bdmagic 
- Windows7download:http://www.windows7download.com/win7-pavtube-bdmagic/pkczmcjn.html 
- Softonic Download:https://pavtube-bdmagic.en.softonic.com/ 
- FullprogramDownload: https://www.fullprogramlarindir.com/pavtube-bdmagic-full-indir.html 
- Eradownload: http://eradownload.com/pavtube-bdmagic-4-8-6-6-with-crack-full/ 
- Eurodownload: http://www.eurodownload.com/download-software/223693/Pavtube-BDMagic.html 
- Qpdownload: http://qpdownload.com/pavtube-bdmagic/

Full Guide: How to rip 3D Blu-ray movie to SBS 3D MP4 video for playback on your 3D devices?
 
Step 1: Load 3D/2D Blu-ray Disc. 

Open Pavtube Blu-ray to Side-by-Side 3D converter and load your source Blu-ray movie. 


Step 2: Choose suitable profile. 

From the “Format” drop-down list, you are suggested to follow the path “3D Video > MP4 Side-by-Side 3D Video(*.mp4)” for ripping Blu-ray to side-by-side 3D MP4 video. 


Step 3: Adjust profile presets (Optional) 

If you like, you could set profile parameters to get better video quality, such as video codec, file size, video bitrate, frame rate, etc. 

Step 4: Start ripping Blu-ray to side-by-side 3D MP4 video. 

Double check above steps and you could click the “Convert” button on program interface to start ripping Blu-ray to side-by-side 3D MP4 video. After it finished, open output file destination, locate the created SBS 3D MP4 video and you could watch it on your 3D player. 

Edit Non-Gopro - Mobius SJ4000 ActionCam Footage in GoPro Studio

Summary: Can we edit Non-Gopro - Mobius SJ4000 ActionCam Footage in GoPro Studio? Sure, we can. I’ll give you a free solution in this article. 

GoPro Studio is designed for editing the footage of GoPro series. If we have a Mobius SJ4000 ActionCam which is non-GoPro and want to import and edit videos from this actioncam, we may run into some compatible problems. After all, GoPro Studio is aimed at its own products.

In order to edit Non-Gopro - Mobius SJ4000 ActionCam Footage in GoPro Studio, we may transcode the footage with a third-party App to the format which GoPro Studio can support perfectly.

Part 1. Free Solution: Windows Movie Maker

If you haven’t installed it, google it and download it from Microsoft website, it’s free on any Windows Machine. First you need to create a custom format setting for GoPro Studio, which specifies the resolution, bit rate, frame rate and audio format. Click on the downward arrow under “Save Movie”, and choose “create custom settings”.


The settings for your custom format depend on your needs.


Once you have saved it, import your Mobius SJ4000 ActionCam Footage to Windows Movie Maker, and click “save movie” with the format you just created. Remember to save the file as “H.264 Video File” (.mp4), this is important!


Now try to import Mobius SJ4000 ActionCam Footage to GoPro Studio again, it should now show up in GoPro Studio! :D

Part 2. Paid Solution: Video Converter

Pavtube Video Converter is an excellent App which can not only convert Mobius SJ4000 ActionCam Footage to H.264 HD Video(*.mp4) for GoPro Studio, but also covert Mobius SJ4000 ActionCam Footage to VLC Media Player for smooth playback. In addition to this, this App is bale to extract the audio track from Mobius SJ4000 ActionCam Footage.

If you want to know about more covnerters, please review Top 10 Video Converter Guide. If you are a Mac user, please turn to Pavtube Video Converter for Mac.


Other Download:
- Pavtube old official address: http://www.pavtube.com/video_converter/
- Amazon Download: http://download.cnet.com/Pavtube-Video-Converter/3000-2194_4-75734821.html
- Cnet Download: http://download.cnet.com/Pavtube-Video-Converter/3000-2194_4-75734821.html

How to Convert Mobius SJ4000 ActionCam Footage to GoPro Studio

Step 1. First of all, transfer the videos from Mobius SJ4000 ActionCam to your computer.

Click "Add Video" or "Add from folder" button to choose your action videos


Step 2. Click on the format bar and follow "HD Video" to select "H.264 HD Video(*.mp4)" as the proper format.


Step 3. Click on the "Convert" button in the main UI to start the conversion. Then you can edit Mobius SJ4000 ActionCam Footage in GoPro Studio with no problem. Enjoy!

Tips:
If videos you want to add are not yet in the Media Bin, follow these instructions:
1. Click on the Media button in the Media Bin. This will open a window that allows you to browse for the video files that you want to import.
2. Locate and select the files that you want to use in your project. Click Open.
The video files should now be added to your Media Bin.
3. Drag the files from the Media Bin to your Storyboard.

Notes:
If you fail to launch Windows Movie Maker, please make sure that your computer meets all necessary requirements.

Further Reading: 

Pavtube Upgrade to Version 4.9.1.0 to Fix Not Reading Blu-ray Disc Issue

Pavtube studio has recently upgraded all its Windows Blu-ray Ripper applications – Pavtube BDMagic,  Pavtube ByteCopy and Pavtube Video Converter Ultimate to the new version 4.9.1.0, which has addressed the following problems: 
  • Not reading Blu-ray disc after installation issue 
  • Fix some bugs
What's New?

1. Bypass copy and region protection from all commercial Blu-ray disc and even the newest one that are equipped with MKB61 and MKB62 encryption.
2. Make a full disc copy of Blu-ray disc with all the original Blu-ray structure
3. Main movie copy of Blu-ray without unwanted comments, trailers, ads, etc.
4. Output Blu-ray to lossless multi-track MKV format (only with Pavtube ByteCopy) with all the subtitle languages and audio tracks.
5. Rip Blu-ray to various different popular file formats and even the new H.265/HEVC MP4/MKV formats.

Tips: All above listed Pavtube Blu-ray Ripper software now supports H.265 encoding acceleration on a PC that running Nvidia GPU technology enabled grahic cards.

6. Directly produce various hot device and program preset profile formats with best playback or editing settings from Blu-ray.
8. Flexibly adjust output profile parameters to get better output video and audio quality.
9. Enabled forced Blu-ray subtitles to disable the traditional subtitles while still preserving the subtitles that translate foreign language speaking parts.
10. Edit Blu-ray video by trimming, cropping, merging, splitting, watermarking, deinterlacing, flipping, apply special rendering effect, change video picture effect, remove/replace audio in video, adding external subtitles to Blu-ray movies.

Pavtube Bytecopy 4.9.1.0 makes your BD/DVD movies compatible for a variety of HD media players and yet retaining the original quality of the content so that you enjoy the same resolution and definition. The conversion is really 'lossless'! Now the advanced media players of age need not be restful at your home and will get alive as now the BD/DVD movies can be converted with ease into formats that are in consonance with these refined players.

Pavtube Bytecopy boasts of multiple parameters for the purpose of BD/DVD ripping. Some of the benefits are as Lossless extraction: Pavtube is best known for the efficient extraction of the MKV file out of your BD/DVDs. This offers all the unique advantages of the MKV container format. Of the significant benefits are- 
'Quality assurance' as for the video that is being transported/ ripped. The MKV file supports various codec regimes and extracts the content as it is!
MKV file format is for free and therefore supports the ripped content playback on a variety of players.

Preserve your ripped video in the defined audio streams together with the subtitles!

Multi track conversion: Pavtube Bytecopy allows for multi track ripping of BD/DVD files into formats like MOV, MP4 and AVI. This functionality increases the compatibility array of your media players and number of mobile and iOS devices for the converted video.

No extras: backup your BD/DVD content through this converter without having to retain the extras. The ripping leaves out the extras and captures only the main movie content from the BD/DVD.

Pavtube Bytecopy has iconic 3D functionality like Original 3D transportation: the BD/DVD conversion transports the 3D effects in their original formats and hence the preserves the visual brilliance of the video!

2D to 3D: generate the 3D effects in the converted video even from the 2D BD/ DVD content files! This converter provides for three different modes
  • side by side
  • top/bottom
  • anaglyph
There Offering for you here is Free

Pavtube Bytecopy has an easy to use and multifunctional video editing tool for the users. Its prime features are as
Volume modulation and adjustment
Subtitles insertion
Cropping, trimming, splitting and merging
Customized video effects!

There Can get it 20% Discount here

Pavtube Bytecopy is a fast converter for the BD/DVD files and has been one of the most successful suites in as far as leveraging the MKV file container benefits and delivering the same in desired manner. Its easy video editing functionality and 3D add ons makes its choice a justified one! So don't remain confined with your rich BD/DVD content and convert them fast to multiple formats with diversified device compatibilities!

Video Converter Ultimate

An extremely all-in-one powerful app to convert, edit, enhance, capture any Blu-ray, DVD and Video files for playing anywhere and anytime you like.

Price: $32.5 50% off

 
BDMagic
Copy BD/DVD with original structure, and convert 2D/3D Blu-rays and standard DVD for watching with fast speed and wonderful quality.

Price: $24.5 50% off

 
ByteCopy
An Efficient, Safe, Fast, Easy-to-use Blu-ray DVD converter and convert movies to MKV/MP4/MOV with multiple audio tracks and subtitles.

Price: $21 50% off


Pavtube Customer Service
Pavtube new site: http://www.multipelife.com/ News, updates, programmings, all can be found on our facebook: http://www.facebook.com/pavtubefans.

Related Articles: 

Convert Panasonic 50i Video to 25P

Summary: In this guide, you can get to know the easy method to convert Panasonic records in 50i format to 25p for upload to YouTube. 

I am primarily a musician and audio engineer, the video editing side of things is mostly just a hobby and for fun. I have a Panasonic camera borrowed from one of my friends. I think it records in 50i (50 interlaced fields) format in full HD, which has to be converted to progressive (25p). As we are doing music videos of our band, now we will probably just put the videos up onto youtube to promote our CD. I use hitfilm 2 ultimate to edit primarily. The goal of editing is just to make something interesting to render. As Panasonic videos isn’t well supppoted by compatible format by many editers, I think only by converting can I avoid video playback, editing and importing problems.I previously used a freeware program but I recently discovered it had adware or spyware so I needed something better. 

Then it was told to me on the hitfilm forums by one of the main staff of hitfilm. And viewing the posts of someone on a forum who’s opinion I highly value, I was highly recommend to use a decent Panasonic Video Converter – Pavtube Video Converter, to help me get it done.I like the ability to convert to most formats – especially from camcorder/camera formats and to the editing codecs like avid’s ones. Plus the price of pavtube is very good and fair. 

Surprising, we find the program is 20% off at Pavtube Christmas Best Seller. 

Convert Panasonic 50i videos to 25p for editing and sharing on Youtube 

1. Install Panasonic Video Converter. Run it and transfer Panasonic video to hard drive, and then click “Add Video” or “Add from folder” to add the Panasonic video clips you need into the program. 

2. Select output format for video editing software. 

Click “Format” menu you will find various video formats listed by different devices. Just choose a compatible video format for your editing software. Choosing the editing software option directly will help you to take less time to find a more preferable video format. 

For sharing on website like Youtube, you can choose MP4 format for output. 


3: Click settings button to adjust the output video’s parameters, such as bitrate, resolution, etc. 

For instance, if you want to convert Panasonic records in 50i format to 25p, set Frame Rate to 25. 


4. Click “Edit” button and you are allowed to trim, crop, add text/image/video watermark or some effect to your output video for making it perfect. 

For example, 

a. You can switch to “Crop” tab. Choose Advanced mode, lock the “Keep Ratio” and you can free change aspect ratio. 

b. You can deinterlace your 50i video to 50p by check the “Deinterlacing” option from “Effect” tab. 


c. The function of adding subtitles to output files will contribute to make your own videos. 

You can use free software Subtitle Edit to edit your subtitle content then add it to output videos 

5. Start converting Panasonic video. 

This Video Converter for Panasonic will convert Panasonic recorded videos at top speed, you can choose rich formats for output, and now I can easily and successfully use Panasonic recorded footages to edit on Windows PC (Windows 8.1/8/7 included), and then upload on Youtube for sharing with your friends and family. It really do a great favor for me, if you have the same problems, you can take a try now! Good luck! 

Tips: 

Need to convert more various formats, or convert DVD and blu-ray movies for backup or further playback? Pavtube iMedia Converter for Mac can help you to accomplish both of them. It is integrated software for converting different videos, DVDs and blu-ray discs. Good news to you that you can get 20% discount at Pavtube Christmas Giveaway. Go to get it now. 

Find more related guides in Pavtube Panasonic Column: 
Source: http://digitalmediasolution.altervista.org/blog/convert-panasonic-50i-video-to-25p/